1 Úvod do kurzu MS Access 2010, 2013, 2016 a 2019
Vítejte v kurzu MS Access. Tento tutoriál je navržen tak, aby uživatele rychle uvedl do provozu s MS Access (dále jen „Přístup“). Jsou demonstrovány čtyři základní moduly Accessu:Tabulky, Formuláře, Sestavy a Dotazy. Nejprve je diskutován obchodní příklad, který poskytuje pozadí pro vývoj jednoduché databáze.
Předpokládá se, že uživatelé tohoto tutoriálu jsou zběhlí v práci s Microsoft Windows XP/Vista/Win7/Win10 atd. a s MS Excel. To zahrnuje použití klávesnice a myši. Výukový program je založen na Microsoft Access, který je součástí sady Microsoft Office Professional, která také obsahuje MS Excel, MS Word a MS Powerpoint.
Tento výukový program pokrývá MS Access 2007, 2010, 2013, 2016 a 2019, které mají společné rozhraní („pás karet“ v horní části), které se liší od předchozích verzí. Pokud máte zájem pracovat s MS Access ’97 nebo 2000, navštivte prosím webovou stránku Microsoft Access Tutorial – Covering MS Access ’97 and 2000.
Výukový program začíná stručným přehledem Relačních databází . Většina dnes používaných systémů pro správu databází je založena na tom, co se nazývá relační databázový model. Access je systém pro správu relačních databází. Poté popíšeme obchodní příklad a poskytneme obrys databáze a aplikací, které chceme vyvinout. V následujících částech poskytujeme podrobné pokyny pro vytváření tabulek, formulářů pro zadávání dat, sestav a dotazů pro aplikaci.
1.1 Zamýšlené publikum
Tento tutoriál je určen pro studenty, kteří teprve začínají se systémem správy databází MS Access.
1.2 Předem požadované znalosti
Tento výukový program předpokládá, že student je obeznámen se základním ovládáním osobního počítače a Windows 2000, Windows XP, Windows Vista nebo Windows 7. Specifické dovednosti požadované pro tento výukový program jsou:
- Používání myši a klávesnice
- Například otevírání a ukládání souborů na pevný disk a na USB flash disk (palec)
- Obecná správa souborů včetně rozdílů mezi písmeny jednotek, pevným diskem atd.
- Spouštění programů z nabídky Start systému Windows
- Minimalizace, maximalizace a změna velikosti oken
Student by měl mít k dispozici USB flash disk (palec) nebo jiné přenosné paměťové zařízení pro ukládání svých souborů, které budou vytvořeny během tohoto tutoriálu.
1.3 Spuštění Microsoft Access na Apple Mac
Jedním z problémů, se kterými se mohou někteří studenti potýkat, je skutečnost, že MS Access běží pouze pod operačním systémem Windows (jako je Windows XP, Vista nebo Windows 7). Pokud máte MacBook, iMac nebo jiný systém Apple se systémem MacOS, který používá procesor Intel, existuje několik možných alternativ, které můžete vyzkoušet. Mnoho moderních počítačů Apple, které používají procesor Intel, může používat operační systém Windows. Pamatujte, že k tomu budete potřebovat legálně licencovanou kopii operačního systému Windows. Existují dva hlavní způsoby, jak toho dosáhnout:
- Svůj Mac můžete nastavit na „Dual Boot“ pro MacOS X i Windows. Jedním z produktů, který to umožňuje, je software Apple BootCamp.
- Operační systém Windows můžete provozovat „vedle sebe“ s Mac OS X pomocí „virtuálního“ počítače, jako je VirtualBox
Obsah
- 1 Úvod do kurzu MS Access
- 1.1 Zamýšlené publikum
- 1.2 Předem požadované znalosti
- 1.3 Spuštění Microsoft Access na Apple Mac
- 2 Stručný přehled relačních databází a databázových aplikací
- 3 Příklad podnikání
- 4 Spuštění aplikace Microsoft Access
- 4.1 Kontrola spuštění Microsoft Access
- 5 Vytváření a prohlížení tabulek
- 5.1 Vytvoření tabulky pomocí zobrazení návrhu
- 5.2 Cvičení:Vytvoření tabulky
- 5.3 Zobrazení a přidávání dat do tabulky
- 5.4 Cvičení:Přidání dat do tabulky
- 5.5 Vytváření vztahů mezi tabulkami
- 5.6 Kontrola vytváření a prohlížení tabulek
- 6 Vytváření a spouštění dotazů
- 6.1 Dotazy na jednu tabulku
- 6.2 Cvičení:Dotazy na jednu tabulku
- 6.3 Dotazy na více tabulek
- 6.4 Cvičení:Dotazy na více tabulek
- 6.5 Kontrola vytváření a spouštění dotazů
- 7 Vytváření a spouštění formulářů pro zadávání dat
- 7.1 Vytvoření formuláře jedné tabulky pomocí průvodce
- 7.2 Cvičení:Vytvoření formuláře s jednou tabulkou
- 7.3 Kontrola vytvoření a spuštění formuláře pro zadávání dat
- 8 Vytváření a spouštění sestav
- 8.1 Vytvoření sestavy s jednou tabulkou pomocí průvodce
- 8.2 Cvičení:Vytvoření sestavy s jednou tabulkou
- 8.3 Kontrola vytvoření a spuštění přehledu
- 9 Vytvoření a spuštění hlavního/podrobného formuláře (formulář s podformulářem)
- 10 Vytvoření a spuštění ústředny
- 11 Vytvoření a spuštění navigačního formuláře
- 11.1 Cvičení:Úprava navigačního formuláře
- 11.2 Nastavení navigačního formuláře jako výchozího
- 12 shrnutí výukového programu a pokročilá témata
Další stránka poskytuje stručný úvod do relačních databází.
2 Stručný přehled relačních databází a databázových aplikací
První databáze implementované během 60. a 70. let byly založeny buď na plochých datových souborech nebo na hierarchických či síťových datových modelech. Tyto metody ukládání dat byly relativně neflexibilní kvůli jejich pevné struktuře a velké závislosti na aplikačních programech při provádění i těch nejrutinnějších zpracování.
Na konci 70. let model relační databáze který vznikl v akademické výzkumné komunitě se stal dostupným v komerčních implementacích, jako je IBM DB2 a Oracle. Relační datový model specifikuje data uložená v relacích které mají nějaké vztahy mezi nimi (odtud název relační ).
V relačních databázích, jako jsou Sybase, MySQL, Oracle, IBM DB2, MS SQL Server a MS Access, jsou data uložena v tabulkách skládá se z jednoho nebo více sloupců (Access nazývá sloupec polem ). Data uložená v každém sloupci musí být jednoho typu dat jako je znak (někdy nazývaný „řetězec“), číslo nebo datum. Soubor hodnot z každého sloupce tabulky se nazývá záznam nebo řádek v tabulce.
Různé tabulky mohou mít stejný sloupec společný. Tato funkce se používá k explicitnímu určení vztahu mezi dvěma tabulkami. Hodnoty zobrazené ve sloupci A v jedné tabulce jsou sdíleny s jinou tabulkou.
Níže jsou uvedeny dva příklady tabulek v relační databázi pro místní banku:
Tabulka zákazníků
| Číslo zákazníka | Křestní jméno | Příjmení | Ulice | Město | Stát | Zip |
|---|---|---|---|---|---|---|
| Číslo | Postava | Postava | Postava | Postava | Postava | Postava |
| 1001 | Joseph | Smith | 123 Lexington | Smithville | KY | 91232 |
| 1002 | Alberta | Jones | 12 Davis Ave. | Smithville | KY | 91232 |
| 1003 | Nathanial | Sekera | 443 Bruska Ln. | Broadville | GA | 81992 |
| 1004 | Paulína | Tvůrce | 661 Parker Rd. | Streetville | GA | 81990 |
Tabulka účtů
| Číslo zákazníka | Číslo účtu | Typ účtu | Datum otevření | Zůstatek |
|---|---|---|---|---|
| Číslo | Číslo | Postava | Datum | Číslo |
| 1001 | 9987 | Kontrola | 10/12/1989 | 4000,00 |
| 1001 | 9980 | Úspory | 10/12/1989 | 2000,00 |
| 1002 | 8811 | Úspory | 01/05/1992 | 1000,00 |
| 1003 | 4422 | Kontrola | 12/01/1994 | 6000,00 |
| 1003 | 4433 | Úspory | 12/01/1994 | 9000,00 |
| 1004 | 3322 | Úspory | 22. 8. 1994 | 500,00 |
| 1004 | 1122 | Kontrola | 13. 11. 1988 | 800,00 |
Tabulka Zákazník má 7 sloupců (CustomerID, First Name, Last Name, Street Address, City, State a PSČ) a 4 řádky (nebo záznamy) dat. Tabulka Účty má 5 sloupců (CustomerID, AccountNumber, AccountType, DateOpened a Balance) se 7 řádky dat.
Každý ze sloupců odpovídá jednomu ze tří základních datových typů :Znak, Číslo nebo Datum. Datový typ pro sloupec označuje typ datových hodnot, které mohou být v tomto sloupci uloženy.
- Číslo – může ukládat pouze čísla, případně s desetinnou čárkou. Může být pozitivní nebo negativní.
- Znak – může obsahovat čísla, písmena a interpunkci. Access volá tento datový typ Text .
- Datum – lze ukládat pouze data a čas.
V některých databázových implementacích existují jiné datové typy, jako jsou obrázky (pro obrázky nebo jiná data). Nejčastěji se však používají výše uvedené tři datové typy.
Všimněte si, že obě tabulky sdílejí sloupec KódZákazníka a že hodnoty sloupce KódZákazníka v tabulce Zákazník jsou stejné jako hodnoty ve sloupci KódZákazníka v tabulce Účty. Tento vztah nám umožňuje určit, že zákazník Nathanial Axe má běžný i spořicí účet, které byly otevřeny ve stejný den:1. prosince 1994.
Jiný název pro takový vztah je Master/Detail . Ve vztahu hlavní / podrobný může mít jeden hlavní záznam (jako je zákazník 1003, Nathanial Axe) mnoho podrobných záznamů (dva účty).
Ve vztahu Master / Detail je možné, aby kmenový záznam existoval bez jakýchkoli podrobností. Je však nemožné mít podrobný záznam bez odpovídajícího hlavního záznamu. Zákazník například nemusí nutně mít vůbec žádné informace o účtu. Jakékoli informace o účtu však musí být spojen s jedním zákazníkem.
Každá tabulka také musí mít speciální sloupec nazvaný Klíč který se používá k jednoznačné identifikaci řádků nebo záznamů v tabulce. Hodnoty v klíčovém sloupci (nebo sloupcích) nesmí být nikdy duplikovány. Ve výše uvedených tabulkách je CustomerID klíčem pro tabulku Customer, zatímco AccountNumber je klíčem pro tabulku Accounts.
3 Příklad podnikání
V této části nastíníme obchodní příklad, který bude použit jako základ pro příklady v celém tutoriálu. V organizacích analyzují podnikání a určují vhodnou strukturu databáze (tabulky a sloupce) obvykle Systems Analysts. . Systémový analytik shromáždí informace o tom, jak firma funguje, a vytvoří model požadavků na ukládání dat. Z tohoto modelu vytvoří databázový programátor databázové tabulky a poté bude spolupracovat s vývojáři aplikace na vývoji zbytku databázové aplikace.
V tomto tutoriálu budeme uvažovat o jednoduchém bankovním podnikání. Banka má mnoho zákazníků, kteří si otevírají a spravují jeden nebo více účtů. U každého zákazníka vedeme záznam jeho jména a adresy. Také jim přiřadíme jedinečné CustomerID. Tento jedinečný identifikátor přidělujeme pro pohodlí i pro přesnost. Je mnohem snazší identifikovat jednotlivého zákazníka pomocí jeho CustomerID než vyhledáním jeho celého jména a adresy. Navíc je možné, aby banka měla dva zákazníky se stejným jménem (např. Bill Smith). V takových případech lze k jejich odlišení vždy použít jedinečné ID zákazníka.
Podobným způsobem je všem účtům přiděleno jedinečné číslo účtu. Účet může být buď běžný účet, nebo spořicí účet. Spořicí účty jsou úročeny, ale jediné povolené transakce jsou vklady a výběry. Běžné účty nejsou úročeny. Uchováváme datum otevření účtu. To nám pomáhá sledovat naše zákazníky a může být užitečné pro marketingové účely. Nakonec udržujeme aktuální zůstatek na účtu.
V předchozí části jsme uvedli strukturu a některá vzorová data pro tabulku Zákazník a tabulku Účty. Ty budou použity k podpoře části pro ukládání dat naší bankovní aplikace.
Databázové aplikace
V jakékoli databázové aplikaci vyžaduje každá z tabulek prostředek pro získání dat do ní a pro pozdější načtení a úpravu dat. Primárním způsobem, jak získat data do tabulek, je použití formulářů pro zadávání dat. Primárními způsoby, jak získat data zpět z tabulek nebo zobrazit data v tabulkách, je použití dotazů nebo sestav. V kompletní databázové aplikaci jsou všechny formuláře a sestavy propojeny v navigačním formuláři – jediné stránce, která bude obsahovat odkazy na každou z částí aplikace. Velká databázová aplikace může mít desítky formulářů pro zadávání dat a sestav.
Pro tento tutoriál vytvoříme formulář pro zadávání dat pro každou tabulku, dotaz pro každou tabulku a sestavu pro každou tabulku.
V následujících částech si nejprve představíme, jak spustit Access a jak vytvořit novou databázi.
4 Spuštění aplikace Microsoft Access
Jako u většiny programů pro Windows lze Access spustit pomocí navigace v nabídce Start v levém dolním rohu plochy Windows.
Chcete-li spustit Access, klikněte na tlačítko Start, poté na nabídku Programy, poté přejděte do nabídky Microsoft Office a nakonec klikněte na položku nabídky Microsoft Access. Nabídka MS Office Professional je zobrazena níže.
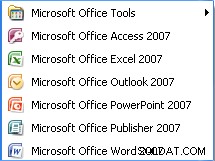
Pamatujte, že toto uspořádání nabídek se může lišit v závislosti na tom, jak byl MS Office nainstalován na počítači, který používáte.
Jakmile je Access spuštěn, zobrazí se úvodní obrazovka:
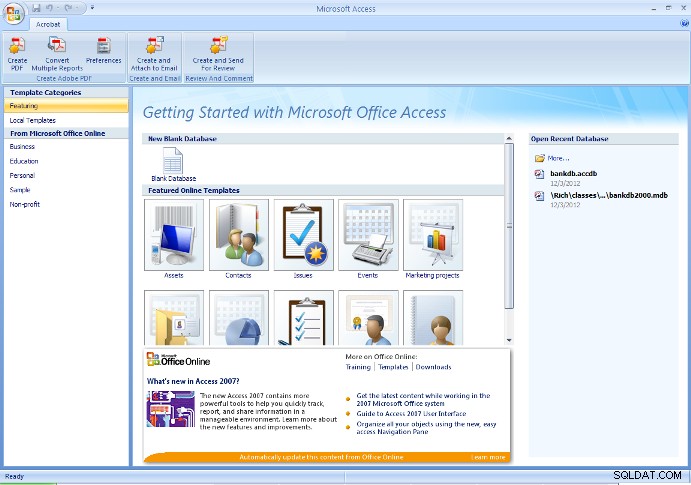
Na této úvodní obrazovce může uživatel vytvořit novou databázi (buď prázdnou, nebo s některými tabulkami vytvořenými pomocí průvodce databáze), nebo otevřít existující databázi.
Obecně platí, že při prvním zahájení projektu by měla být vytvořena nová, prázdná databáze. Poté použijte Otevřít existující databázi možnost znovu otevřít dříve vytvořenou databázi.
Upozornění – Pokud jste již dříve vytvořili databázi a poté ji znovu vytvoříte se stejným názvem, přepíšete veškerou vykonanou práci.
Pro účely tohoto tutoriálu, pokud tyto kroky procházíte poprvé, zvolte možnost vytvořit novou, prázdnou databázi, jak je znázorněno na obrázku výše.
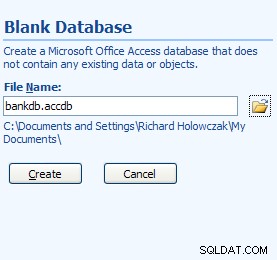
V Accessu 2007 klikněte na kulaté tlačítko Office v levém horním rohu a z rozbalovací nabídky vyberte Nový. Vyplňte Název souboru jako bankdb.accdb a kliknutím na tlačítko Vytvořit vytvořte databázi jako na obrázku níže.
Nová obrazovka databáze pro Access 2007
Ve výše uvedeném názvu souboru je bankdb název vybraný pro tuto konkrétní databázi a .accdb je přípona názvu souboru pro Microsoft DataBase 2007, 2010 a 2013.
Je vhodné ponechat název databáze (ve výše uvedeném příkladu bankdb) relativně krátký a v názvu databáze nepoužívat mezery ani jinou interpunkci. Také název databáze by měl odrážet obsah databáze.
Po vytvoření nové databáze se zobrazí následující hlavní obrazovka aplikace Access:
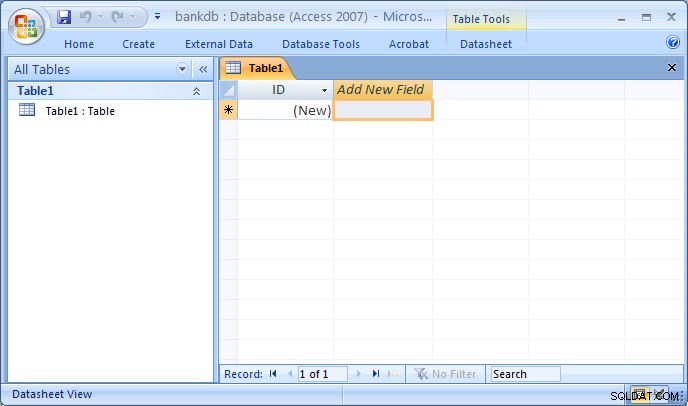
Rozvržení obrazovky pro MS Access 2007 se výrazně liší od předchozích verzí. Většina karet v horní části obrazovky byla přeuspořádána. Kromě toho se výchozí hlavní obrazovka po vytvoření nové databáze automaticky přepne do zobrazení Návrh a vytvoří novou tabulku.
V horní části obrazovky se zobrazí následující karty:
- Karta Domů – Ovládací prvky pro změnu písem, provádění dotazů, kopírování/vkládání/vyjímání dat atd.
- Karta Vytvořit – Ovládací prvky pro vytváření tabulek, formulářů, sestav atd.
- Karta Externí data – Ovládací prvky pro načítání dat z jiných zdrojů dat do MS Access.
- Karta Databázové nástroje – Ovládací prvky pro správu databází (zabezpečení, ústředna atd.)
- Karta Návrh – Objeví se při návrhu nové tabulky, formuláře, sestavy atd.
Všimněte si, že rozhraní pro Access 2007, 2010 a 2013 jsou všechna podobná, i když verze, kterou používáte, se může mírně lišit od obrázků obsažených v tomto tutoriálu.
4.1 Kontrola spuštění Microsoft Access
Spuštění aplikace Microsoft Access:
- Pomocí tlačítka Start na hlavním panelu otevřete:Programy -> MS Office -> Microsoft Access
- Chcete-li vytvořit novou databázi, zvolte Prázdná databáze a zadejte nový název souboru pro databázi. Nezapomeňte pro novou databázi použít popisný název. Klepnutím na tlačítko OK vytvořte novou databázi.
- Chcete-li otevřít existující databázi, zvolte Otevřít existující databázi , zvýrazněte Další soubory… a klepněte na tlačítko OK. Poté přejděte na jednotku, zvýrazněte existující databázový soubor na pevném disku nebo jednotce USB a opětovným kliknutím na tlačítko OK databázi otevřete.
Chcete-li ukončit Access, roztáhněte nabídku Soubor (nebo nabídku Office) a vyberte položku nabídky Exit.
5 Vytváření a prohlížení tabulek
Tabulky jsou hlavní jednotky úložiště dat v Accessu. Připomeňme, že tabulka se skládá z jednoho nebo více sloupců (nebo pole ) a že daný sloupec se může objevit ve více než jedné tabulce za účelem označení vztahu mezi tabulkami.
Z výše uvedeného obchodního příkladu jsme usoudili, že k uložení údajů o zákaznících by stačily dvě tabulky. a jejich bankovní účty . Nyní poskytujeme podrobné pokyny pro vytvoření těchto dvou tabulek v Accessu.
Existuje několik způsobů, jak vytvořit tabulku v Accessu. Access poskytuje průvodce které uživatele provedou vytvořením tabulky tím, že navrhnou názvy pro tabulky a sloupce. Dalším hlavním způsobem vytvoření tabulky je použití Zobrazení návrhu ručně definovat sloupce (pole) a jejich datové typy.
I když je použití průvodců rychlým způsobem vytváření tabulek, uživatel má menší kontrolu nad názvy sloupců (polí) a datovými typy. V tomto tutoriálu popíšeme kroky k vytvoření tabulky pomocí Návrhového zobrazení . Studenti jsou vyzýváni, aby sami experimentovali s použitím průvodce vytvořením tabulky.
5.1 Vytvoření tabulky pomocí zobrazení návrhu
Chcete-li vytvořit tabulku v Accessu pomocí návrhového zobrazení, proveďte následující kroky:
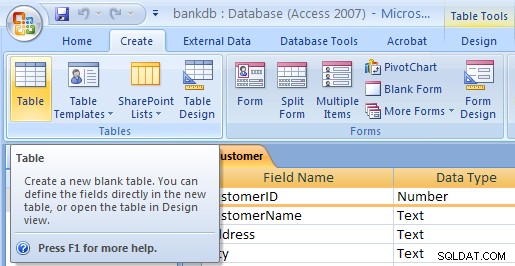
- V Accessu 2007, 2010 a 2013 by již karta Vytvořit novou tabulku měla být zvýrazněna a měla by být vytvořena nová tabulka s názvem table1. Pokud tomu tak není, klikněte na Vytvořit a klikněte na Tabulku ikona. Poté stáhněte dolů Zobrazit a vyberte Zobrazení návrhu .

- Zobrazí se zobrazení návrhu tabulky. Vyplňte Název pole , Typ dat a Popis pro každý sloupec/pole v tabulce. Pole CustomerID je vyplněno níže:
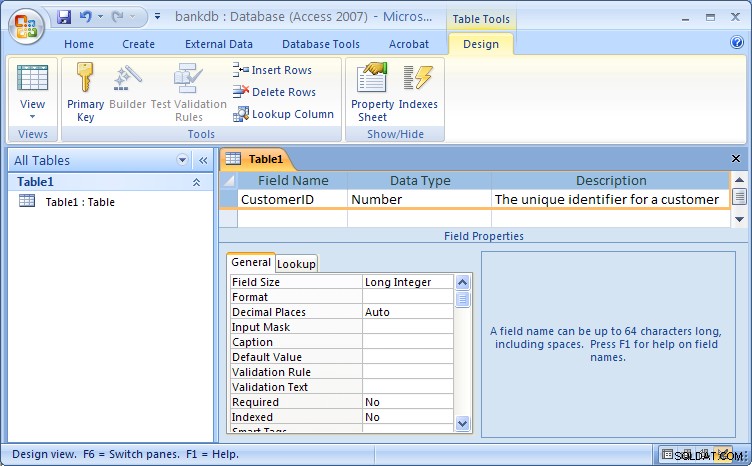
Zobrazení návrhu tabulky pro Access 2007Všimněte si, že výchozí název pro tabulku je Tabulka1 . V pozdějším kroku přiřadíme této tabulce vhodný název.
Vyplňte informace do polí následovně:
Název pole Typ dat Popis Číslo zákazníka Číslo Jedinečný identifikátor pro zákazníka Jméno Text Křestní jméno zákazníka Příjmení Text Příjmení zákazníka Adresa ulice Text Ulice zákazníka Město Text Město zákazníka Stát Text Domovský stát zákazníka Zip Text PSČ zákazníka Obrázek znázorňující zobrazení návrhu s vyplněnou novou definicí tabulky je uveden níže:

Dalším krokem je definování klíče pro tabulku a uložení tabulky.
- Nyní, když byla pro tabulku definována všechna pole, by měl být definován primární klíč. Připomeňme, že primární klíč bude použit k jednoznačné identifikaci záznamu v tabulce (v tomto případě zákazníka). Zvýrazněte CustomerID a klikněte na tlačítko Primární klíč na tlačítkové liště
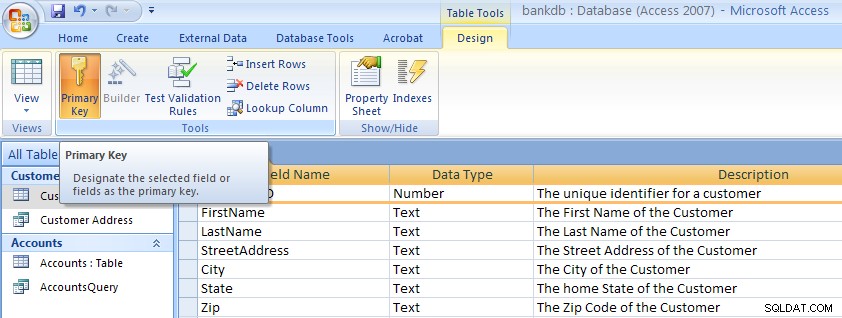 Všimněte si, že se vedle názvu pole na levé straně zobrazuje malý klíč. Poznámka:Chcete-li odebrat primární klíč , jednoduše opakujte tento postup pro vypnutí primárního klíče.
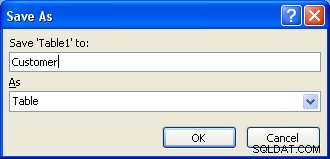
- V posledním kroku je nutné tabulku uložit. Stáhněte nabídku Office a vyberte položku nabídky Uložit jako. Zobrazí se dialogové okno, kde je třeba zadat název nové tabulky. Všimněte si, že Access poskytuje výchozí název, například Tabulka1 nebo Tabulka2 . Jednoduše přepište tento výchozí název názvem tabulky. V tomto příkladu pojmenujte tabulku:Zákazník Poté klikněte na tlačítko OK.
V tomto okamžiku byla vytvořena a uložena nová tabulka Zákazník.
Poznámka k pojmenování polí (sloupců) v MS Access
Při definování polí (sloupců) pro tabulku je důležité používat názvy polí, které poskytují jasnou představu o datovém obsahu sloupce. Označuje například pole CNO Zákaznické číslo nebo Číslo kontejneru?
Názvy polí v Accessu mohou mít až 64 znaků a mohou obsahovat mezery. Důrazně se však nedoporučuje používat mezery v názvech polí a tabulek . Chcete-li názvy polí usnadnit čtení, zvažte použití podtržítka k oddělení slov. Ujistěte se však, že se před ani za podtržítkem neobjeví žádné mezery.
Následující tabulka shrnuje některé různé způsoby zadávání názvů polí:
| Popis | Špatné | Dobré |
|---|---|---|
| Jedinečný identifikátor pro zákazníka | CID | CustomerID nebo Customer_ID |
| Popis produktu | PDESC | Popis produktu |
| Telefonní číslo zaměstnance domů | Employee_home_telephone_number | HomePhone |
| Číslo bankovního účtu | BA# | Číslo účtu |
5.2 Cvičení:Vytvoření tabulky
Vytvořte Účty podle stejných kroků jako při vytvoření tabulky Zákazník.
- Klikněte na kartu Vytvořit a poté klikněte na Tabulku knoflík.
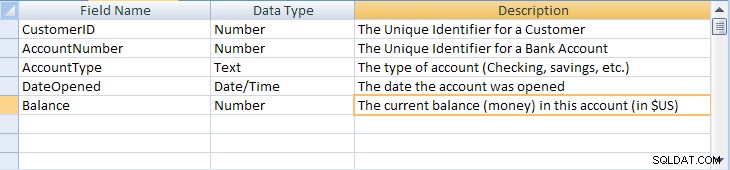
- Vytáhněte nabídku Zobrazit a zvolte Návrh. Zobrazí se zobrazení návrhu tabulky. Vyplňte Název pole , Typ dat a Popis pro každý sloupec/pole v tabulce Účty.
Název pole Typ dat Popis Číslo zákazníka Číslo Jedinečný identifikátor pro zákazníka Číslo účtu Číslo Jedinečný identifikátor bankovního účtu Typ účtu Text Typ účtu (kontrolní, spořící atd.) Datum otevření Datum Datum otevření účtu Zůstatek Číslo Aktuální zůstatek (peníze) na tomto účtu (v USD) Obrázek znázorňující zobrazení návrhu s vyplněnou novou definicí tabulky je uveden níže:
- Definujte primární klíč pro tabulku Účty. Klikněte na Číslo účtu pole s vpravo tlačítko myši a z rozbalovací nabídky vyberte Primární klíč.
- Uložte novou tabulku účtů tak, že stáhnete nabídku Soubor a vyberete položku nabídky Uložit. Vyplňte název tabulky:Účty Poté klikněte na tlačítko OK.
Všimněte si, že existuje řada dalších kroků, které je možné podniknout ke zlepšení a ozdobení tabulek v MS Access, včetně zadání výchozích hodnot, vytváření hodnot pro vyhledávání a maskování datových vstupů podle konkrétního vzoru. Podrobnosti nejsou pro tento aktuální tutoriál důležité, ale pokud vás to zajímá, podívejte se na stránku Advanced MS Access Table Design, na kterou je odkaz zde.
5.3 Zobrazení a přidávání dat do tabulky
Data lze přidávat, mazat nebo upravovat v tabulkách pomocí jednoduchého zobrazení podobného tabulkovému procesoru. Chcete-li vyvolat toto zobrazení dat jedné tabulky, zvýrazněte název tabulky a poté dvakrát klikněte na název tabulky.
V tomto zobrazení tabulky Zákazník, jak je znázorněno na obrázku níže, se pole (sloupce) zobrazí v horní části okna a řádky nebo záznamy se zobrazí níže. Toto zobrazení je podobné tomu, jak by byla navržena tabulka.
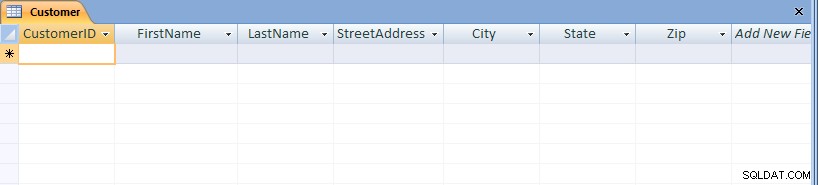
Všimněte si, že ve spodní části okna je zobrazen počet záznamů. V tomto případě, protože tabulka byla právě vytvořena, se zobrazí pouze jeden prázdný záznam.
Chcete-li do tabulky přidat data, jednoduše zadejte hodnoty pro každé z polí (sloupců). Stisknutím klávesy Tab se můžete pohybovat mezi poli v záznamu. Mezi záznamy se můžete pohybovat pomocí kláves se šipkami nahoru a dolů. Zadejte data, jak je uvedeno níže:
| Číslo zákazníka | Jméno | Příjmení | StreetAddress | Město | Stát | Zip |
|---|---|---|---|---|---|---|
| 1001 | Joseph | Smith | 123 Lexington | Smithville | KY | 91232 |
| 1002 | Alberta | Jones | 12 Davis Ave. | Smithville | KY | 91232 |
| 1003 | Nathanial | Sekera | 443 Bruska Ln. | Broadville | GA | 81992 |
| 1004 | Paulína | Tvůrce | 661 Parker Rd. | Streetville | GA | 81990 |

Chcete-li uložit nová data, stáhněte si nabídku Office a vyberte Uložit.
Chcete-li přejít na další záznamy v tabulce, použijte navigační panel ve spodní části obrazovky:
Chcete-li upravit existující data, jednoduše přejděte na požadovaný záznam a přejděte na příslušné pole pomocí karty. Pomocí kláves se šipkami a kláves Delete nebo Backspace změňte stávající data.
Chcete-li odstranit záznam, nejprve přejděte na požadovaný záznam. Poté stáhněte nabídku Úpravy a vyberte položku nabídky Odstranit.
Chcete-li zavřít tabulku a vrátit se na hlavní obrazovku Accessu, stáhněte si nabídku Soubor a vyberte položku nabídky Zavřít.
5.4 Cvičení:Přidání dat do tabulky
Pro toto cvičení otevřete tabulku Účty a přidejte data pro sedm účtů uvedených v části 2. Ujistěte se, že data zadáváte přesně tak, jak je uvedeno, včetně velkých písmen v datech do pole Typ účtu. např. zadejte Úspory místo úspory nebo ÚSPORY.
Pamatujte, že při zadávání dat zadejte celé čtyři číslice roku. Ve výchozím nastavení Access zobrazuje všechny 4 číslice roku (starší verze Accessu zobrazovala pouze dvě číslice).
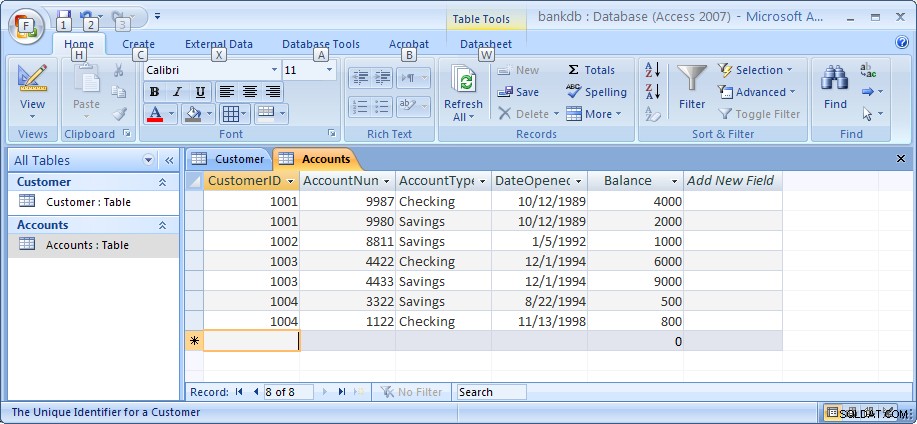
Až budete hotovi, nezapomeňte data uložit. Obrázek níže ukazuje tabulku Účty a data tak, jak by se měly zobrazit, až budete s tímto cvičením hotovi.
V tomto bodě kurzu jsme vytvořili dvě tabulky, Zákazníci a Účty, a do každé jsme přidali data. V následujících částech se budeme zabývat tím, jak dotazovat data v tabulkách a vytvářet sestavy a jak vytvořit uživatelsky přívětivý formulář pro zadávání dat pomocí průvodců Access.
Poznámka:Můj návod na MS Access Advanced Table Design najdete na tomto odkazu. Možná si to budete chtít ověřit, až dokončíte zbytek tohoto kurzu.
5.5 Vytváření vztahů mezi tabulkami
Připomeňme, že jednou z hlavních charakteristik relačních databází je skutečnost, že všechny tabulky spolu souvisí. V databázi Bank doposud tabulka Zákazníci souvisí s tabulkou Účty díky poli CustomerID, které se objevuje v obou tabulkách. Access má prostředky k tomu, aby byl tento vztah explicitní pomocí obrazovky Vztahy. Access tyto informace používá při navrhování sestav, formulářů a dotazů, které vyžadují zobrazení více než jedné tabulky.
Chcete-li začít, ujistěte se, že jsou obě tabulky Účty a tabulka Zákazník uzavřeny. Pokud je tabulka aktuálně otevřena, Access zastaví vytváření všech vztahů. Chcete-li stůl zavřít, klikněte buď pravým tlačítkem na název stolu na kartě nad tabulkou a vyberte položku nabídky Zavřít, nebo klikněte na malé X vpravo nad tabulkou.

Dále zobrazte obrazovku Vztahy kliknutím na kartu Databázové nástroje a poté klikněte na tlačítko Vztahy, jak je znázorněno níže. 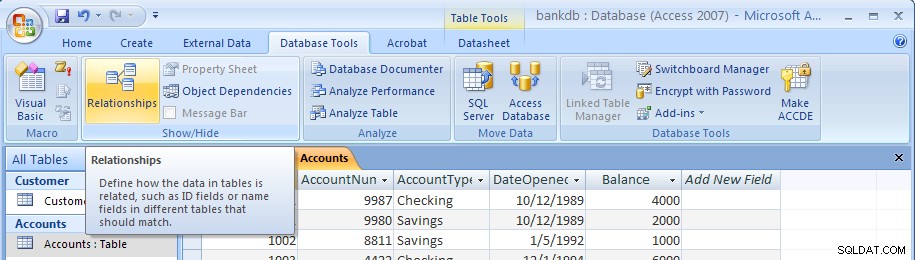
Zobrazí se prázdná obrazovka Relationships:
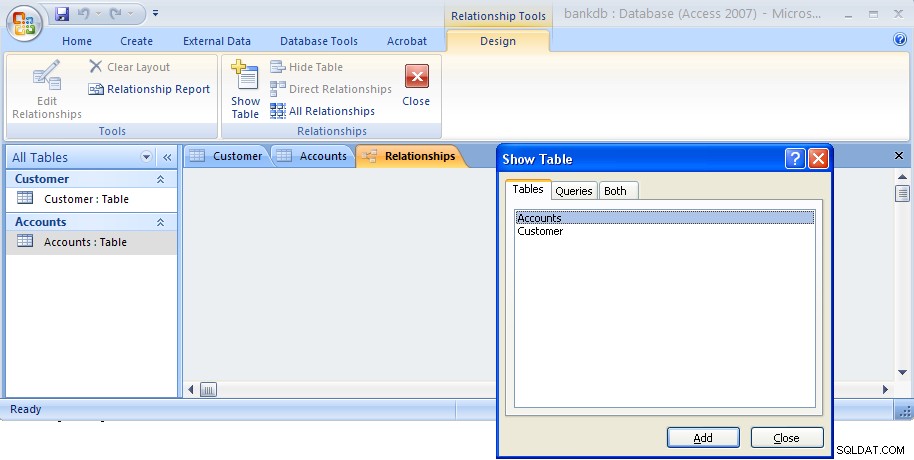
Ve výchozím nastavení se zobrazí dialogové okno Zobrazit tabulku. Zvýrazněte tabulku Zákazníci i tabulku Účty, jak je uvedeno níže, a poté klikněte na tlačítko Přidat.

Poté kliknutím na tlačítko Zavřít toto dialogové okno zavřete. Nyní se znovu objeví obrazovka Vztahy se dvěma tabulkami zobrazenými níže:
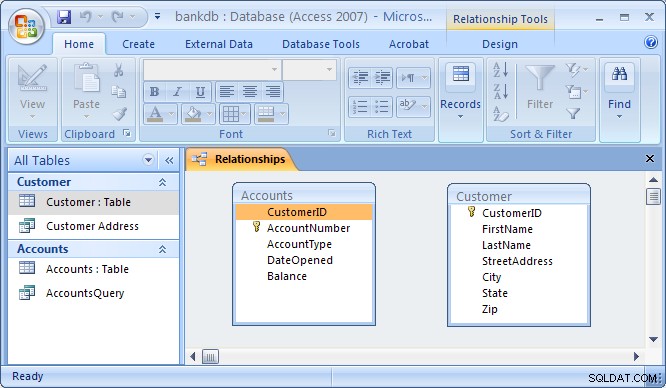
Chcete-li propojit tabulku Zákazníci s tabulkou Účty za účelem vytvoření vztahu, klikněte na pole KódZákazníka v tabulce Zákazníci a přetáhněte jej nad pole KódZákazníka v tabulce Účty. Po uvolnění tlačítka myši se zobrazí dialogové okno Upravit vztahy jako níže:
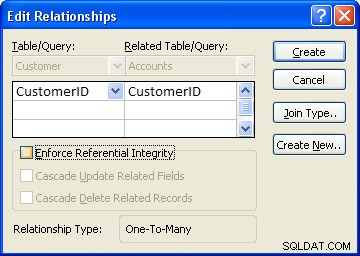
Access se pokusí určit typ vztahu (téměř vždy vybere Jedna k mnoha ). V tomto příkladu Access ví, že KódZákazníka je klíč tabulky Zákazník, takže vybere toto pole jako stranu „Jedna“. Tím se tabulka účtů stane stranou „Mnoho“ jako Jeden customer may have Many accounts.
One additional step to be taken is the check off the box labeled “Enforce Referential Integrity”. This option puts constraints into effect such that an Accounts record can not be created without a valid Customer record, and Access will also prevent a user from deleting a Customer record if a related Accounts record exists. At this point, click on the Create button to create the relationship. The Relationships screen should reappear with the new relationship in place as follows:
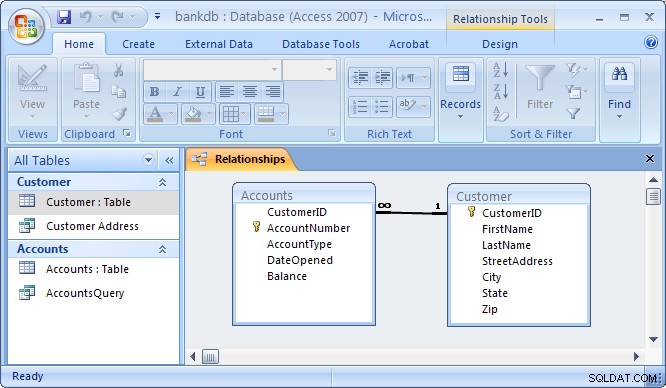
Note the symbols “1” (indicating the “One” side) and the infinity symbol (indicating the “Many” side) on the relationship. Close the relationships screen and select Yes to save the changes to the Relationships layout.
If the relationship does not appear in the above fashion, highlight it and press the delete key to delete it. Then go back to the table design view and make certain that the CustomerID field is designated as the key of the Customers table. Then go back to the Relationships screen and try to recreate the relationship.
5.6 Review of Creating and Viewing Tables
Creating a new table requires the following steps:
- Click on the Tables tab on the Access main screen
- Click on the New button.
- Choose the Design View and click the OK button.
- Fill in the name, data type and description of each of the fields in the table.
- Designate a primary key by clicking on one of the fields with the right mouse button and then choose Primary Key from the pop-up menu.
- Save the table by pulling down the File menu and choosing Save.
- Close the new table by pulling down the File menu and choosing Close.
To change the design of an existing table (e.g., to add, change or delete a field):
- Click on the Tables tab on the Access main screen
- Highlight the name of the table to be modified and click on the Design button.
- Make the necessary changes.
- Save the table by pulling down the File menu and choosing Save.
- Close the table by pulling down the File menu and choosing Close.
To add, delete or change data in an existing table:
- Click on the Tables tab on the Access main screen
- Highlight the name of the table to be modified and click on the Open button.
- Make the necessary changes to the data.
- Save the table data by pulling down the File menu and choosing Save.
- Close the table by pulling down the File menu and choosing Close.
To create or edit relationships between tables:
- Pull down the Tools menu and select the Relationships menu item.
- To display tables, right click and choose Add Tables
- To create new relationships, drag a key field from one table and drop it on the associated field in another table
- To edit an existing relationship, double click on the relationship line.
- To delete an existing relationship, click on the relationship line and press the delete key.
6 Creating and Running Queries
Queries are a fundamental means of accessing and displaying data from tables. Queries can access a single table or multiple tables. Examples of queries for our bank database might include:
- Which Customers live in Georgia ?
- Which Accounts have less than a $500 balance ?
- What is the total amount of money deposited by each Cusomter?
- Which Checking account has the largest balance?
Queries can be used to carry out other tasks such as for creating formatted reports and data entry forms, and for exporting subsets of data to Excel or another software program.
In this section, we show how to use the Access Wizards to create queries for a single table and for multiple tables.
6.1 Single Table Queries
In this section, we demonstrate how to query a single table. Single table queries are useful to gain a view of the data in a table that:
- only displays certain fields (columns) in the output
- sorts the records in a particular order
- performs some statistics on the records such as calculating the sum of data values in a column or counting the number of records, or
- filters the records by showing only those records that match some criteria. For example, show only those bank customers living in GA.
Creating a query can be accomplished by using either the query design view or the Query wizard. In the following example, we will use the query wizard to create a query.
To create a new query, click on the Create tab. Then click on the Query wizard button.
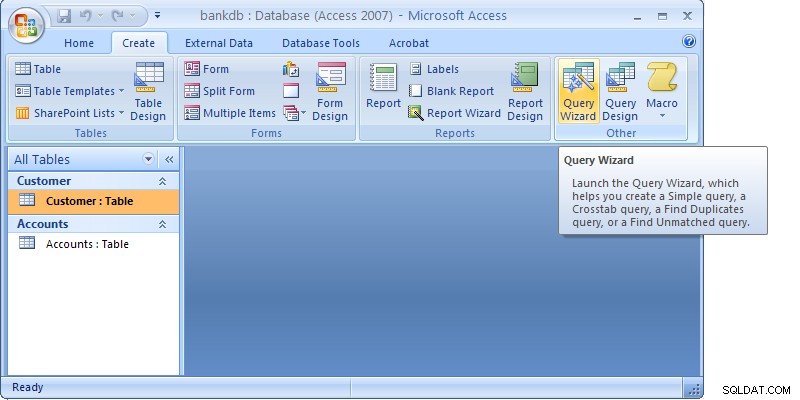
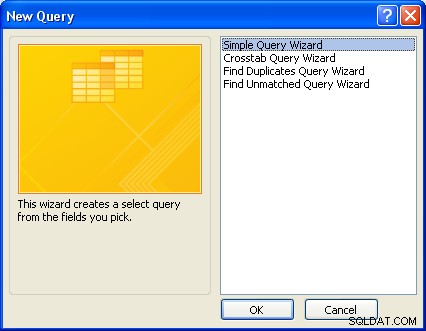
When the Query wizard appears, highlight the Simple Query Wizard selection and click on the OK button.
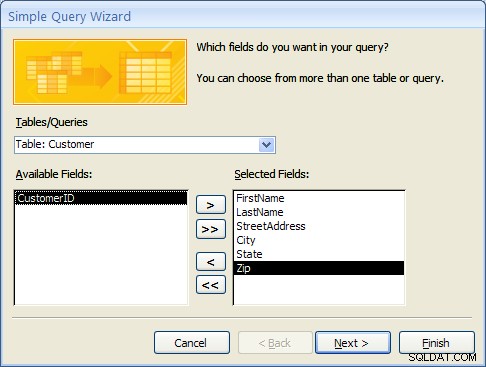
The first step in the Simple Query wizard is to specify the table for the query and which fields (columns) should be displayed in the query output. Three main sections of this step are:
- Tables/Queries – A pick list of tables or queries you have created.
- Available Fields – Those fields from the table that can be displayed.
- Selected Fields – Those fields from the table that will be displayed.
For this example, pull down the Tables/Queries list and choose the Customer table. Notice that the available fields change to list only those fields in the Customer table. This step is shown below:

From the list of Available fields on the left, move the FirstName, LastName, StreetAddress, City and State fields over to the Selected Fields area on the right. Highlight one of the fields and then click on the right arrow button  in the center between the two areas. Repeat this for each of the four fields to be displayed. When done with this step, the wizard should appear as below:
Click on the Next button to move to the next and final step in the Simple Query wizard.
In the final step, give your new query a name. For this example, name the query:Customer Address
At this point, the wizard will create the new query with the option to either:
- Open the query to view information – that is, the wizard will execute the query and show the data.
- Modify the query design – the wizard will switch to the Design View to allow further modification of the query.
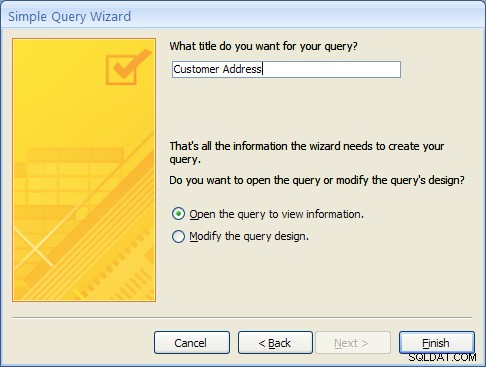
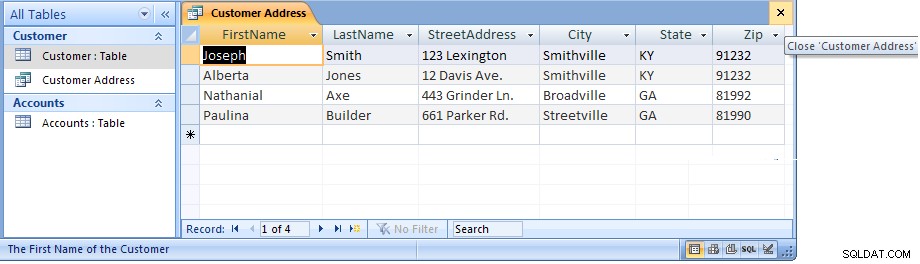
For this example, choose Open the query to view information and click on the Finish button. When this query executes, only the customer’s name, address, city and state fields appear, however, all of the rows appear as shown in the figure below:

Close this query by clicking on the X in the upper right corner of the query results as shown in the figure below:
The Access main screen showing the Queries tab should appear. Note the new query Customer Address appears under the Customers table.
6.1 Single Table Queries (Continued)
In the following example, we will modify the Customer Address query to only display customers in a certain state. To accomplish this, we will make use of the Query Design View.
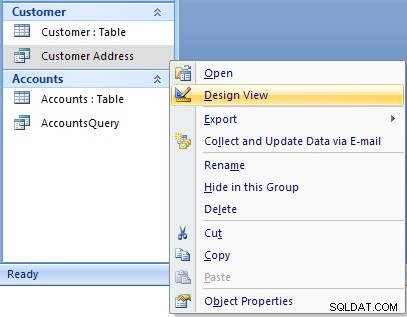
Open up the Customer Address query in the design view by right-clicking on the name of the query. Then select the Design View menu item as shown below.
The design view will appear as in the figure below:
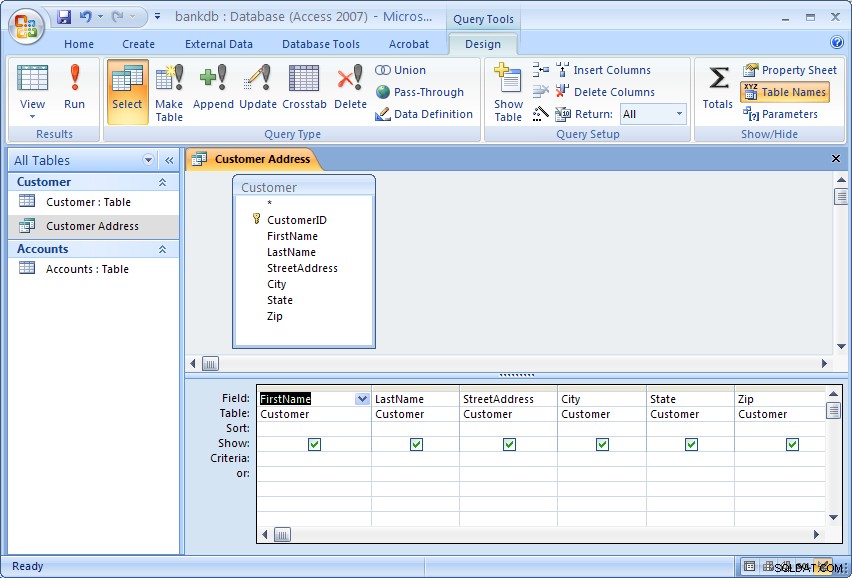
The Query Design view has two major sections. In the top section, the table(s) used for the query are displayed along with the available fields. In the bottom section, those fields that have been selected for use in the query are displayed.
Each field has several options associated with it:
- Field – The name of the field from the table
- Table – The table the field comes from
- Sort – The order in which to sort on this field (Ascending, Descending or Not Sorted)
- Show – Whether or not to display this field in the query output
- Criteria – Indicates how to filter the records in the query output.
For this example, we will filter the records to only display those customers living in the State of Georgia (GA). We will also sort the records on the City field.
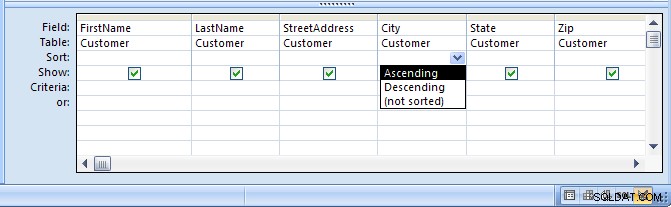
To sort the records on the City field, click in the Sort area beneath the City pole. Choose Ascending from the list as shown in the figure below:
To filter the output to only display Customers in Georgia, click in the Criteria area beneath the State field and type the following statement: ='GA'
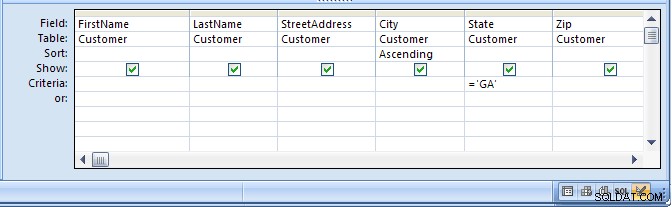
The ='GA' statement tells Access to only show those records where the value of the State field is equal to ‘GA’. Note the use of single quotes to surround the characters.
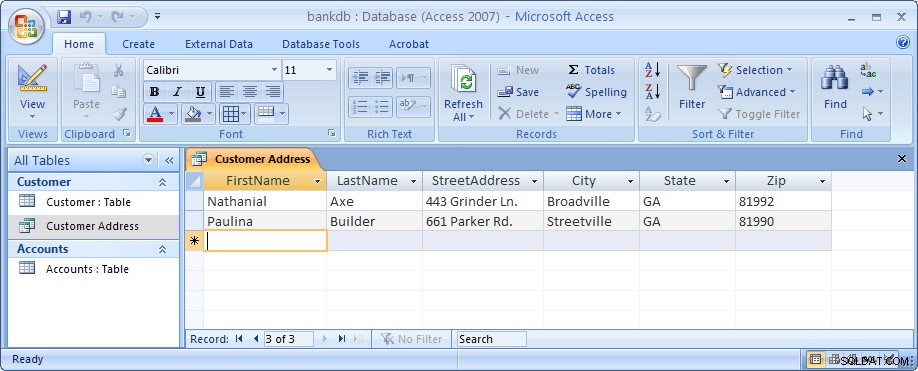
Run the query by clicking on the Run button (with the large red exclamation point). The output is shown in the figure below:
Finally, save and close this query to return to the Access main screen.
6.2 Exercise:Single Table Queries
For this exercise, use the Simple Query wizard to create a query on the Accounts table showing just the AccountNumber, AccountType and Balance fields.
- From the Access main screen, click on the Create tab. Then click on the Query Wizard button.
- Choose the Simple Query wizard option and click on the OK button.
- Under Table/Queries:choose the Accounts table. Then move the AccountNumber, AccountType and Balance fields over to the Selected fields area. Then click the Next button.
- In the next panel, you will be asked to choose between a detail or summary query. Choose detailed query and click on the Next button.
- Name the new Query :AccountsQuery and click on the Finish button.
The output is shown below:

Close this query by pulling down the Office menu and choosing Close.
In the next part of the exercise, we will modify the query to sort the output on the account number and only display the Savings accounts.
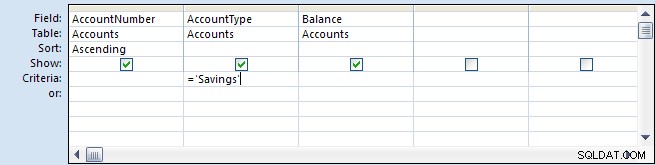
- From the Queries tab on the Access main screen, highlight the AccountsQuery and click on the Design button.
- Change the Sort order for the AccountNumber field to Ascending.Add the following statement to the Criteria:are under the AccountType field:=‘Savings’
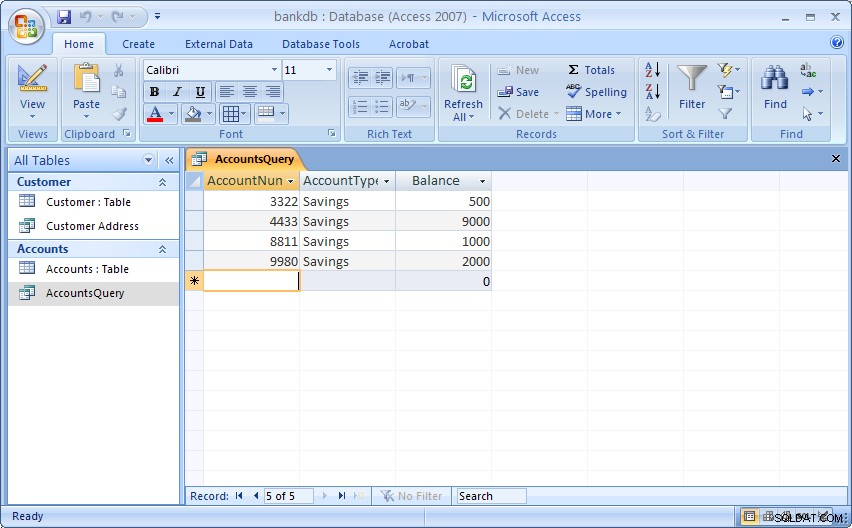
- Run the query by double-clicking on the AccountsQuery name. The output is shown below:
- Finally, save and close the query to return to the Access main screen.
6.3 Multiple Table Queries
Up to this point, queries involving only one table have been demonstrated. It is almost a given that queries will need to involve more than one table. For this example, assume that a manager would like to see a list of all of the customers and the type of account(s) that each one maintains at the bank. Such a query requires data from both the Customers table as well as the Accounts table. In such queries, Access will rely on the Relationships established between tables to guide how the data will be assembled to satisfy the query.
Before proceeding with these next instructions, make certain the One-to-Many relationship between the Customers and Accounts table has been created (see section 5.5 Creating Relationships for a review of this process).
To start the process of creating a multiple table query, highlight the Create tab and click on the Query Wizard button to create a new query. Select the “Simple Query Wizard” option as was done previously.
When the simple query wizard appears, select the CustomerID and LastName fields from the Customers table, then switch the Tables/Queries selection to the Accounts table and select the CustomerID, AccountType and Balance fields from the Accounts table. The result from this step is down below:
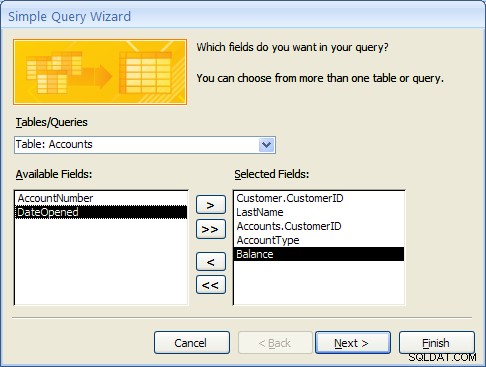
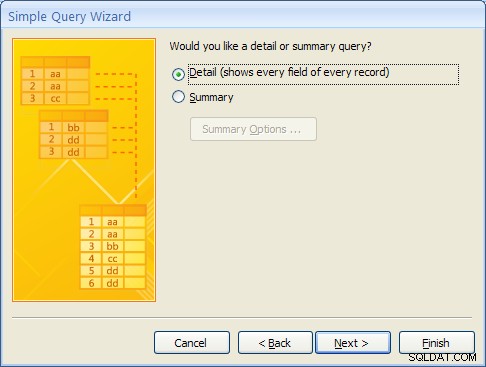
Click the Next button to continue. In the next step of the wizard, an option will appear to provide some level of Summary. For this example, leave the default at “Detail …” as shown below and then click on the Next button.
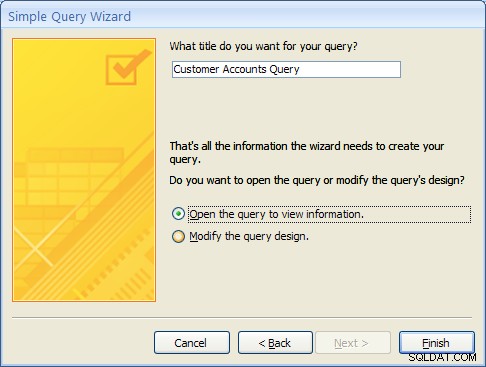
In the final step of the wizard, name the query “Customer Accounts Query” and click on the Finish button. The multiple table query results should appear as follows:
MS Access knows how to line up (or “join”) the accounts table to the Customer table for this query due to the relationship that was created when the tables were first defined.
As with single table queries demonstrated previously, one can change the query definition in design view by adding filters (e.g., show account information for all customers in ‘GA’).
6.4 Exercise:Multiple Table Queries
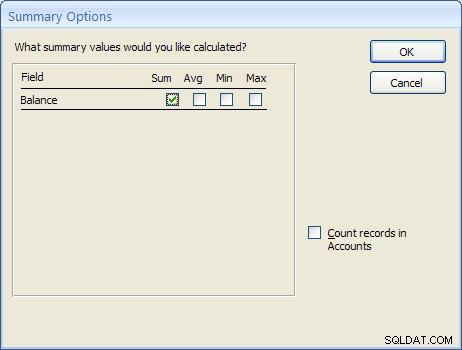
For this exercise, create a new query called “Accounts Summary Query” that joins the Customers table (include the CustomerID and LastName fields) with the Accounts table (include the Balance field only). In the second step of the wizard, click on the Summary choice (instead of Details) and then click on the Summary Options… button. Check off all of the Summary option boxes such as Sum , AVG , Min and Max as shown in the figure below:
The resulting query should appear as follows:
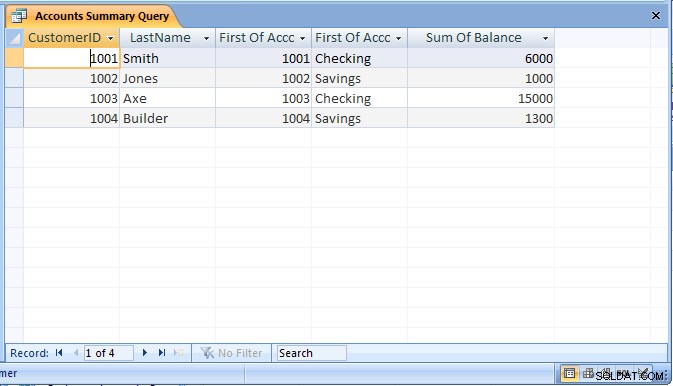
Be sure to save the query as “Accounts Summary Query”.
6.5 Review of Creating and Running Queries
In this section, the basic steps for creating and running queries were introduced. The query wizard can be used to create simple queries that access a single table. It is also possible to then modify the query to sort or filter the records.
Creating a query using the query wizard:
- From the Access main screen, click on the Queries tab. Then click on the New button.
- From the Queries tab on the main Access screen, click on the New button and choose the Simple Query wizard option.
- Under Table/Queries:choose the appropriate table for the query and then indicate which fields in the table will appear in the query output.If querying more than one table, change the Table/Queries:selection to display additional tables and select the necessary fields.
- If the table contains numeric fields, either detailed or summary information may be specified for the query.
- Finally, name the new query and click on the Finish button.
As a final note, Forms and Reports can be created based on existing queries.
7 Creating and Running a Data Entry Form
Data entry forms are the primary means of entering data into tables in the database. In a previous section, we described how to add data to a table using a spreadsheet-like view of the data. Data entry forms offer a more user-friendly interface by adding labels for each field and other helpful information.
Access provides several different ways of creating data entry forms. These include:
- Creating the forms by hand using a Design View
- Creating a default form based on all of the fields available in a table or a query
- Creating a form based on a number of different wizards that walk the user through the forms creation process.
As with queries, a data entry form can be based on a single table or it can work on multiple tables at the same time.
In this section, we cover the basic steps for using a wizard to create a data entry form based on a single table. After this exercise, a multiple-table form is demonstrated.
7.1 Creating a Single Table Form using the Wizard
In this example, we will create a simple data entry form for the Customer table. To begin the process, click on the Create tab on the Access main screen. As with the other components in Access, there are buttons for creating a New form, Open an existing form and Design an existing form. For this example, click on the New button to create a new form.
Several buttons for creating a new form will appear. For this tutorial, choose the Form wizard.
In the first step of the Form wizard, we need to specify the fields from the Customer table that will appear on the form. In this case, we want all of the fields to appear. Move each of the fields from the Available Fields side over to the Selected Fields side as in the following figure. Then click on the Next button.

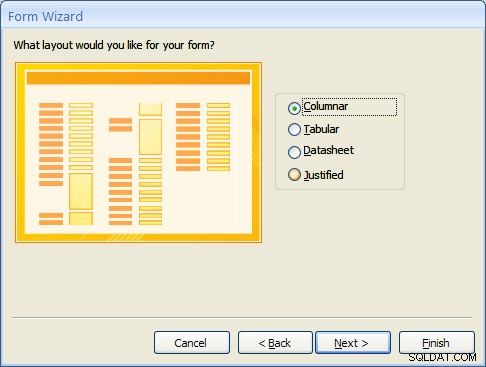
Forms can have several different layouts or arrangement of the labels and fields on the screen.
- Columnar – Places the labels to the left of each field. This is similar to a paper form. This layout is suitable for viewing data one record at a time.
- Tabular – Places the field labels at the top of the screen and the records are displayed below. This is similar to how a spreadsheet would display the data and is suitable for displaying multiple records of data at a time.
- Datasheet – The data appears in the same fashion as when viewing or adding data to a table.
- Justified – Places the labels above each field with the fields spread out on the form. This is suitable for viewing a single record at a time as with the columnar layout.
For this example, choose the columnar layout as shown in the figure below and click on the Next button.
At this point, MS Access 2007 and 2010/2013 versions are a bit different. Access 2007 will show several sample display styles that determine how the form will appear, including elements such as fonts, colors and the background used in the form. Access 2010 and 2013 skips this step in this wizard and provides styles that can be applied to the form in Design mode. For this example, for MS Access 2007, select the Office style as shown below and click on the Next button.

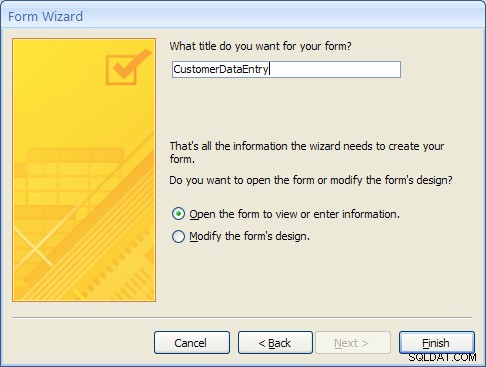
As a final step, give this new form the name:CustomerDataEntry and then click on the Finish button as shown below:
The new form will be created by the wizard and then opened. It should appear as in the figure below:
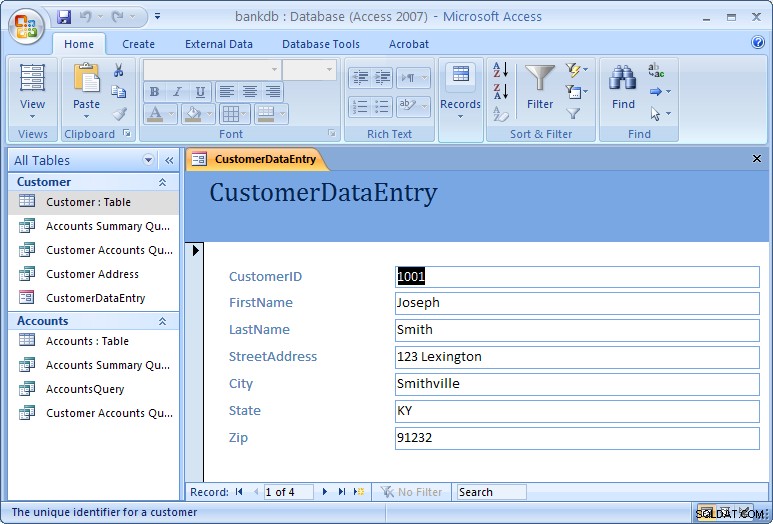
Use the tab key to navigate between fields in the form. To move to the next or previous record, use the record navigation bar at the bottom of the form:
The buttons on the navigation bar perform the following functions:
 | Go to the first record. |
 | Go to the previous record. |
 | Go to the next record. |
 | Go to the last record.  Go past the last record to add a new record. Go past the last record to add a new record. |
To close the form and return to the Access main screen, pull down the File menu and choose Close.
To open the form at any time, highlight the form name under the Forms tab on the Access main screen and click on the Open button.
One quick final note on forms. When the form is created, MS Access looks at how the table is designed and creates the form based on the properties of the table. If you make any changes to the table, you will need to re-create the form again in order to see those table changes reflected in the form. One example where this might happen is is if you change a column in your table from a text box to a combo box, or if you add or remove any columns from your table.
7.2 Exercise:Creating a Single Table Form
For this exercise, we will create a data entry form for the Accounts table created in a previous exercise.
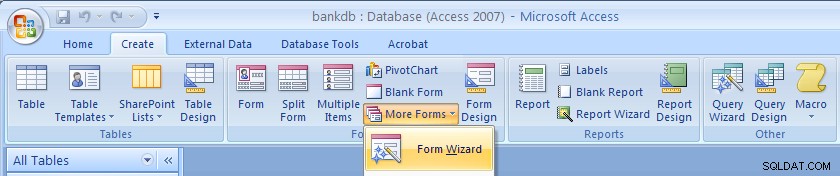
- Click on the Create tab on the Access main screen and then click on the More Forms… button and the “Forms Wizard” to create a new form.
- Select the Accounts table and all of the available fields and click on the Next button.
- Choose a Tabular layout and click on the Next button.
- For Access 2007 choose the Office style and click on the Next button.
- Name the form:AccountsDataEntry Then click on the Finish button to create, save and view the new form.
The new form is shown in the figure below:
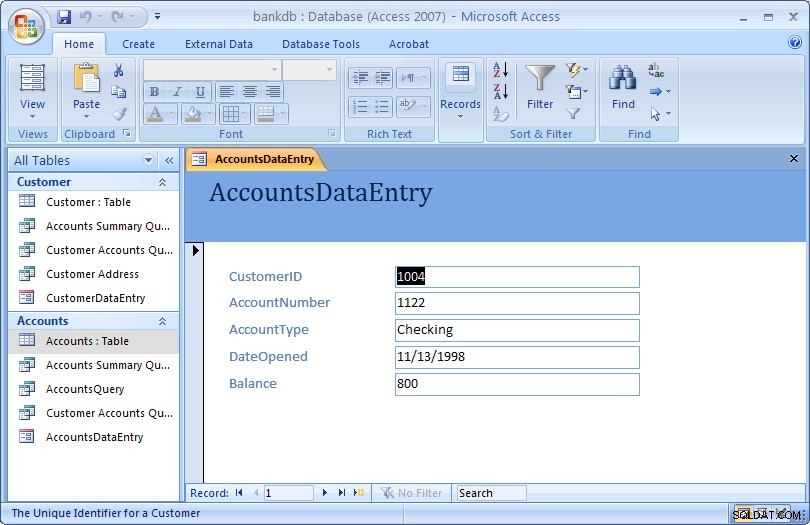
Close the form and return to the Access main screen, by pulling down the File (or Office) menu and choosing Close.
7.3 Review of Creating and Running a Data Entry Form
The basic steps for creating a simple data entry form are:
- Choose a table and a form wizard
- Specify the fields (columns) that will appear in the form
- Specify the layout for the form
- Specify the style (fonts/colors, etc.) for the form
- Save, create and run the new form
In this section we covered the basic steps required to create and run a data entry form. Access provides wizards which are adept at building simple forms with a minimal amount of work. More advanced work on forms would concentrate on using the Design View to change a form’s appearance and to add or remove fields and labels once a form is created. A more advanced tutorial on MS Access Forms Design is linked here.
8 Creating and Running a Report
Reports are similar to queries in that they retrieve data from one or more tables and display the records. Unlike queries, however, reports add formatting to the output including fonts, colors, backgrounds and other features. Reports are often printed out on paper rather than just viewed on the screen. They can also be attached to e-mail and exported and posted as web pages.
As with data entry forms, there are a number of ways to create reports in MS Access:
- A report can be created “by hand” in Design view
- A default report can be created automatically based on all of the firleds for a given table.
- A report can be created using the Create Report wizard.
In this section, we cover how to create simple reports using the Report wizard.
8.1 Creating a Single Table Report using the Wizard
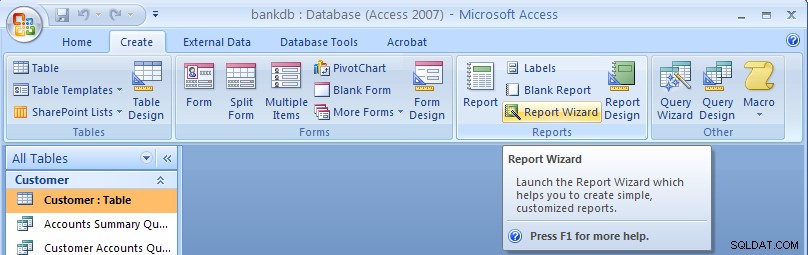
In this example, we will create a simple report for a single table using the Report wizard. As with the Queries and Forms, we begin by selecting the Create tab from the Access main screen.
To create a new report, click on the Report Wizard button.
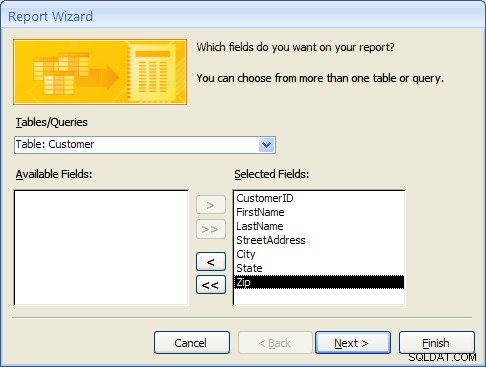
In the next step of the Report wizard, is used to specify the fields from the Customer table that will appear on the report. In this case, we want all of the fields to appear. Move each of the fields from the Available Fields side over to the Selected Fields side as in the following figure. Then click on the Next button.
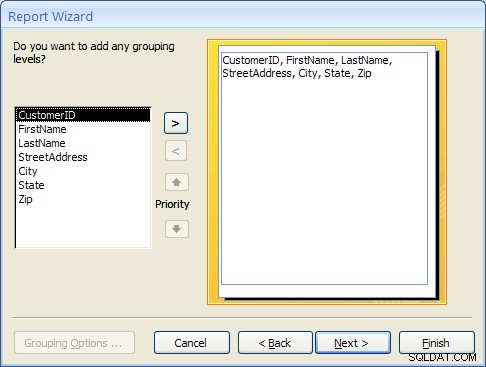
In the next step, we have the opportunity to add Grouping Levels to the report. A grouping level is where several records have the same value for a given field and we only display the value for the first records. In this case, we will not use any grouping levels so simply click on the Next button as shown below.
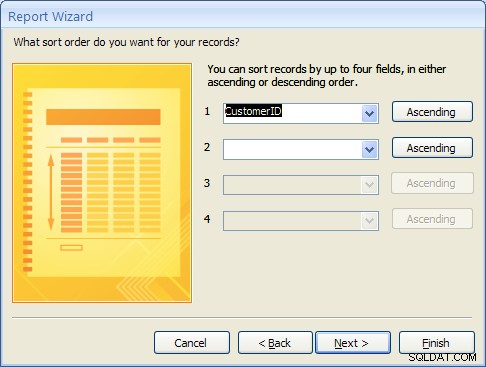
In the next step, the sorting order of the report can be specified. For this example, we will sort the records on the CustomerID field. To achieve this, pull down the list box next to the number 1:and choose the CustomerID field as shown in the figure below. Then click on the Next button.
8.1 Creating a Single Table Report using the Wizard (Continued)
The next step is to specify the layout of the report. The three options are:
- Columnar – Places the labels to the left of each field. This is similar to a paper form.
- Tabular – Places the field labels at the top of the report page and the records are displayed below. This is similar to how a spreadsheet would display the data.
- Justified – Places the labels above each field with the fields spread out on the report page.
Generally, reports use the tabular layout. For this example, choose Tabular layout and set the page Orientation to Landscape so that all of the fields will fit across one page. This is shown in the figure below. Click on the Next button to continue.

In the next step, the style of the report can be selected. For this example, choose the Office style and click on the Next button to continue.

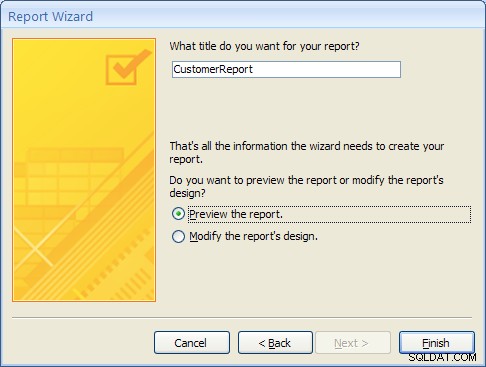
Finally, give a name for the new report:CustomerReport and then click on the Finish button to create, save and display the new report.
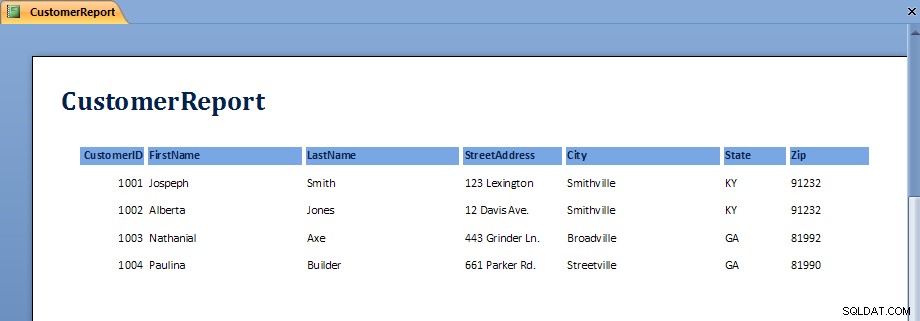
The output from the report is shown in the figure below. Note that on some screens, the last field, Zip, may not display without scrolling over to the right.
Once the report is displayed, it can be viewed, printed or transferred into Microsoft Word or Microsoft Excel. The button bar across the top of the screen has the following functions:
 | Print the report |
 | Zoom into a region of the report |
 | Display the report as one, two or multiple pages |
 | Zoom into or out of the report |
 | Transfer the report into MS Word |
 | Close the report |
To close the report and return to the Access main screen, click on the Close button.
8.2 Exercise:Creating a Single Table Report
For this exercise, we will create a report showing all of the Accounts information.
- From the Access main screen, click on the Create tab and Click on the Report wizard.
- Select all of the fields in the Accounts table by moving them all over to the Selected Fields side and then click Next
- Group the report by CustomerID by clicking on the CustomerID field and then clicking on the right arrow button. This is shown in the following figure:
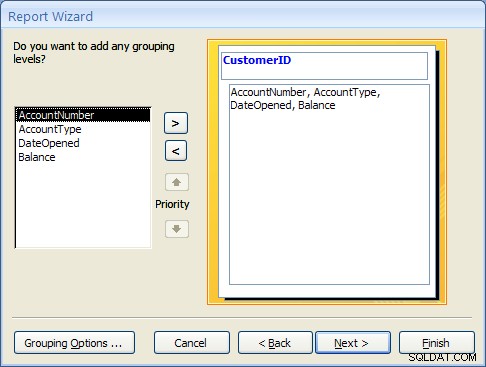
Click on the Next button to continue. - Choose to sort the report on the AccountNumber pole. Note that a new button will appear called Summary Options.
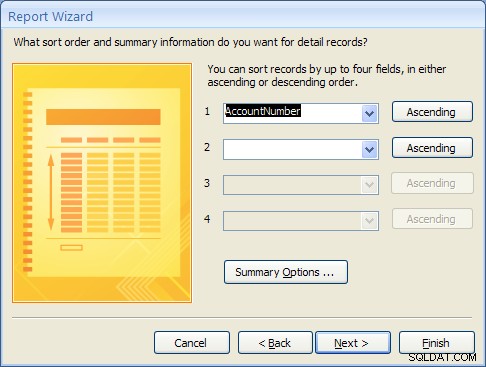
Click on the Summary Options button. Choose the Balance field and select the Sum option. Choose the option to show both Detail and Summary data. Then click on the OK button.

Click on the Next button. - Choose a Block layout and click on the Next button.
- Choose the Corporate style and the click on the Next button.
- Finally, name the report:AccountsReport and click on the Finish button to create, save and run the report.
The output from the AccountsReport is shown below:
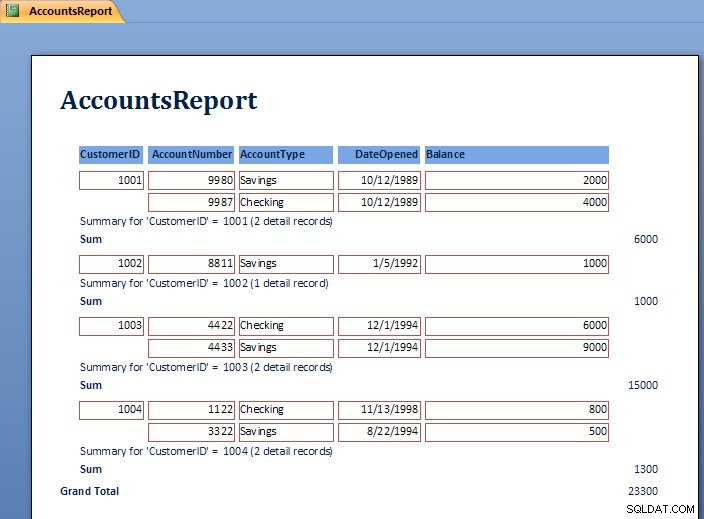
Note the Grouping at the level of the CustomerID and the Sum for each customer’s balances.
To close the report and return to the Access main screen, pull down the File menu and choose Close.
8.3 Review of Creating and Running a Report
As can be seen in the report exercise, there are many ways to create reports to show summation, sorting and layout of the data. Further study of Reports will show how to modify the layout using the Design View. Students are encouraged to work with the Report wizards to create different styles and types of reports.
9 Creating and Running a Master/Detail Form
Master/Detail forms are used to display data from two tables at the same time. MS Access calls the “details” a “subform”. The forms are linked according to the relationship between the tables. Recall that in the example database, the CustomerID is used to link the Customer table (Master) to the Accounts table (Detail). In this section a master / detail form for the Customer and Accounts tables will be created.
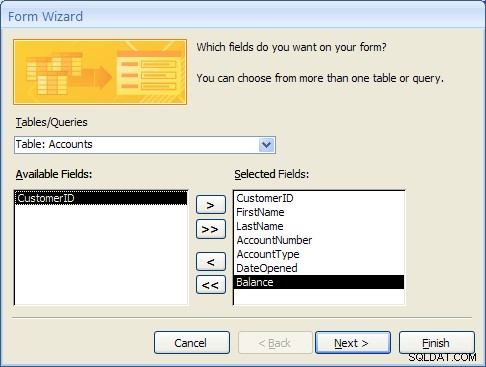
- From the Access main screen, click on the Create tab and Click on the “More Forms…” section and finally the “Forms Wizard”.Select the Customer table first and move the CustomerID, FirstName and LastName fields to the Selected Fields list.Next, select the Accounts table and move the AccountNumber, AccountType, DateOpened and Balance fields to the Selected Fields list as shown below.
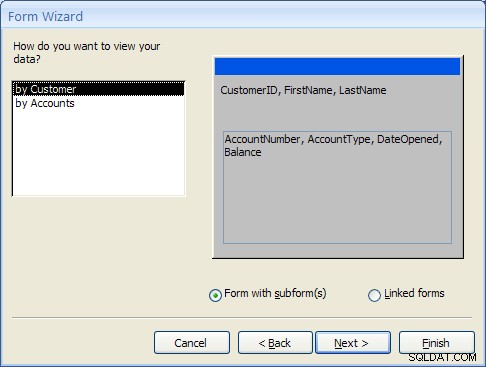
Click the Next… button to move to the next step. - At this point MS Access detects that this form will involve data from two different tables. The first prompt asks how the form should be organized at the top or “Master” level. The “by Customer” selection should be highlighted.The second prompt asks how the forms should be created. For this example, select “Form with Subform(s)” as shown below and click the Next… button to move to the next step.
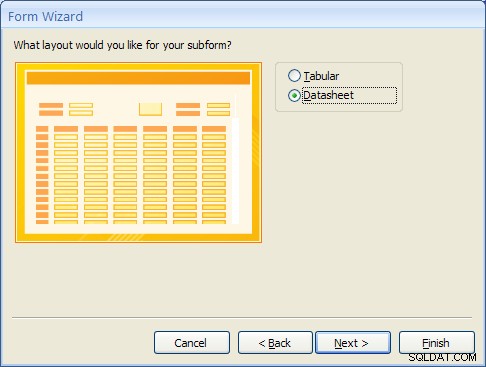
- The Subform is the form that will display the detailed data from the Accounts table. Selecting the “Datasheet” layout will make it easy for the user to view the multiple accounts a Customer may have. Select “Datasheet” and click the Next… button to move to the next step.
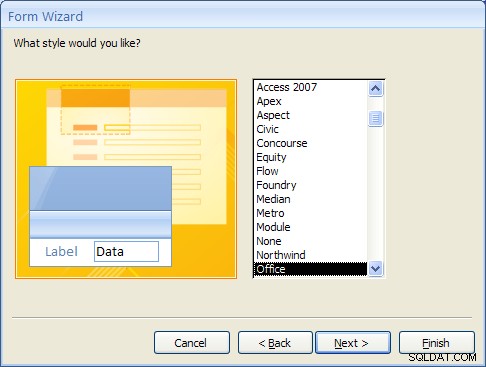
- For Access 2007, select the Office style and click the Next… button to move to the next step. (This step will not appear in MS Access 2010 or 2013).
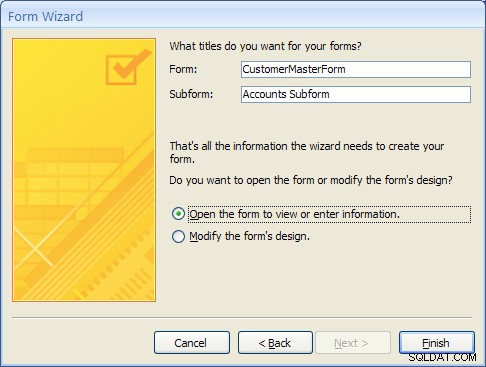
- Finally, give the main form the name “CustomerMasterForm” and the Subform the name “Accounts Subform”.
- After clicking on the Finish button the new Master/Detail form will appear as shown below.
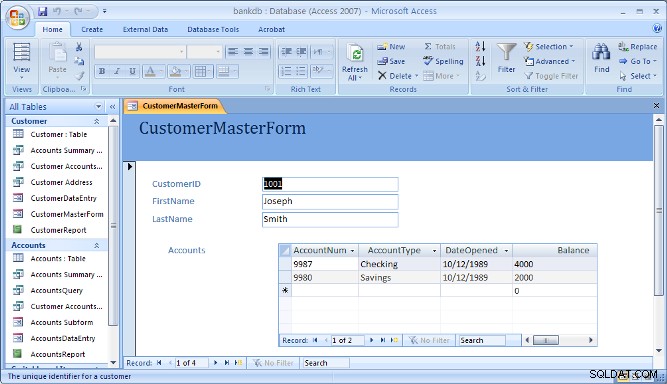
Note that the navigation bar at the bottom of the form is used to navigate through the records in the Master (or top) part of the form.
10 Creating and Running a Switchboard
A Switchboard is a type of form that displays a menu of items that a user can click on to launch data entry forms, reports, queries and other actions in the database. A switchboard is typically created after all of the forms and reports for a database application have been completed. It can be used to guide the user to an appropriate set of forms and reports.
Note that starting with Access 2010, Switchboards are not available by default (you will need to add this to the ribbon bar manually using the Options). Access 2010 and 2013 make use of the Navigation Forms.
In this section, a default switchboard will be created.
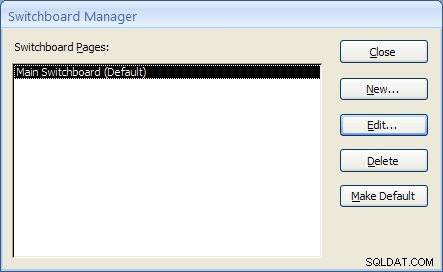
- From the Access main screen, click on the Database Tools tab and Click on the Switchboard Manager as shown in the figure below.

If this is the first switchboard made for this database, you will be prompted to create a new one as shown below. Click the Yes button.

- The Switchboard manager will appear as shown below:
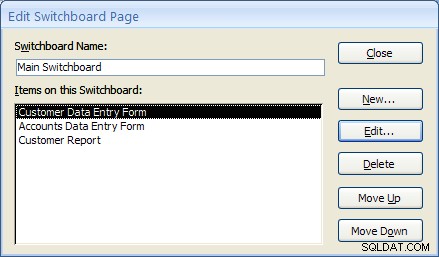
- Click on the Edit menu to edit the “Main Switchboard”. The Edit Switchboard Page will appear as shown below:
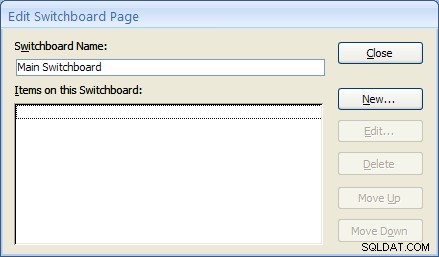
- Add a new switchboard item by clicking on the New… button. The Edit Switchboard Item form will appear as shown below. Fill in the fields as follows:
Text: Customer Data Entry Form Command: Select Open Form in Edit Mode from the drop down list. Form: Select the “CustomerDataEntry” form from the drop down list. 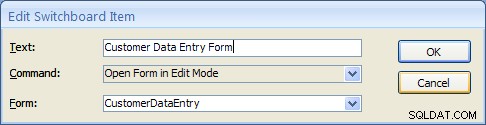
Click on the OK button to save this new Switchboard item.
- Repeat the above step two more times to add Switchboard items for the Accounts DataEntry form and the Customer Report.
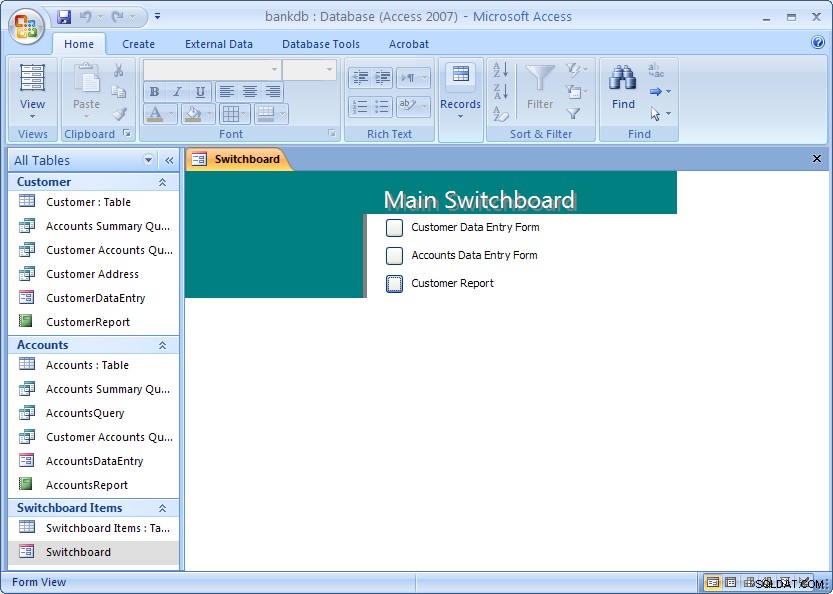
Once completed, click the Close button. Then click the Close button once more to close the Switchboard manager. - From the main MS Access screen look for a new section labeled Switchboard items. To view the switchboard, double-click on name “Switchboard”.
The next section covers creating a Navigation Form which is the recommended navigation screen for MS Access 2007, 2010 and newer versions.
11 Creating and Running a Navigation Form
MS Access 2010 introduced a new form called a Navigation Form. Navigation forms take the place of Switchboards but provide much the same functionality. Namely, they are designed to give the user the ability to run forms and reports without having to hunt through all of the different menus and lists objects. Typically a database application will have one main Navigation form that will appear when the database is opened.
In this section, the basic steps for creating and running a Navigation Form in MS Access 2010 will be demonstrated.
A Navigation Form is another type of form in MS Access 2010 and 2013
- To get started, click on the Create tab on the Access 2010 or 2013 ribbon bar. Under the section for Forms look for the item labeled Navigation Form. Note that this may be located on the button labeled Other Forms.
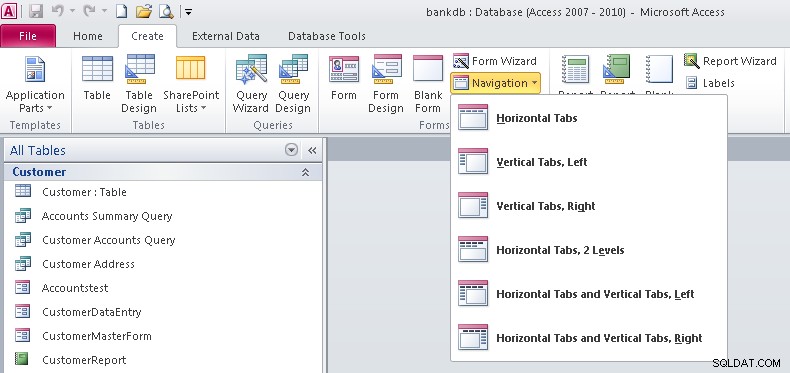
- Note that there are 6 different default styles of Navigation Forms. Each one places the buttons in a different configuration on the screem. Buttons can be aligned across the top, either side or some combination.For this tutorial select the Horizontal Tabs configuration which appears as the first item on the list.
- At this point a new Navigation Form will be created with a row of tabs across the top. The first tab will be labeled [Add New]
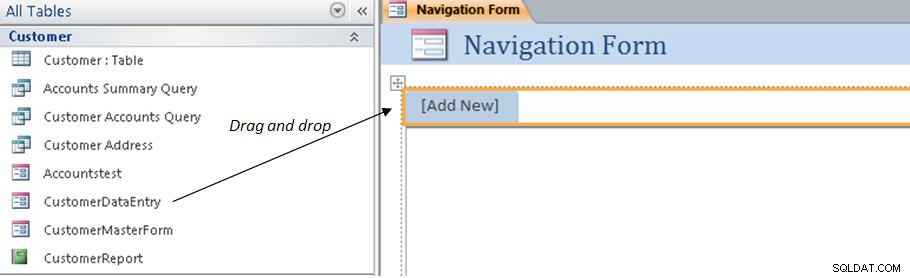
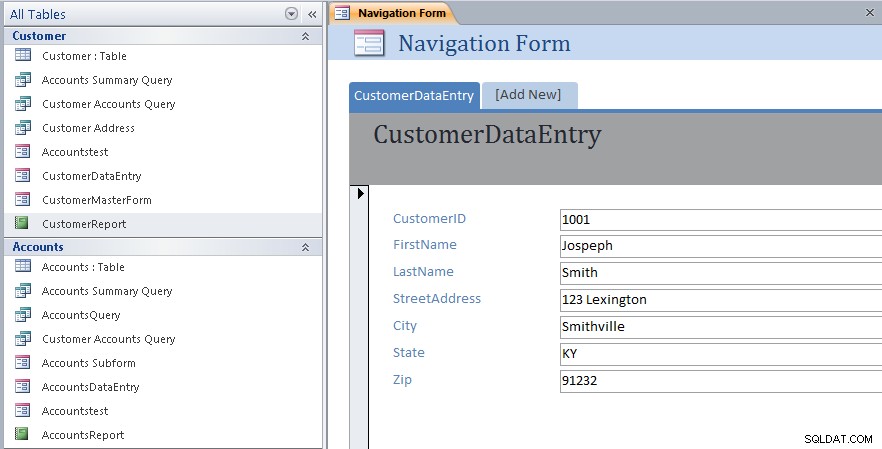
- To add items to the Navigation form, drag the items from the list on the left over to the spot on the Navigation Form labeled [Add New]. This is shown by the arrow in the above figure. For example, drag over the CustomerDataEntry form to the Navigation Form. The result is shown below.
- Next drag and drop the CustomerMasterForm as shown below.

- Next drag and drop the CustomerReport as shown below.
- At this point we have created a new navigation Form and added three items along the top of the page. Save the Navigation Form by right-clicking on the name of the form and choosing Save as shown below:
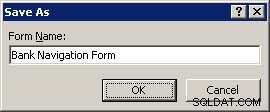
- Name the Navigation Form:Bank Navigation Form and click the OK button.
- Close up the Navigation Form by right-clicking again on the name of the form and choosing Close menu item.At this point the new Navigation Form has been created and saved. The next step will be to view the Navigation Form and navigate the different forms and reports linked to it.
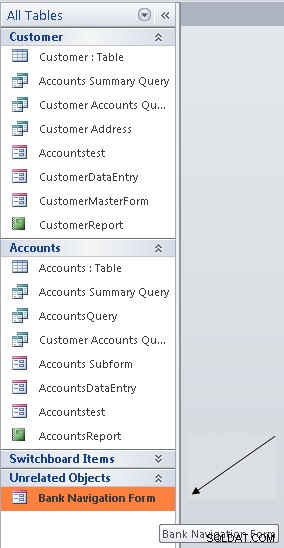
- To view the Navigation Form, look for the Unrelated Objects group on the left side of the screen. Double click on the Bank Navigation Form item as shown below:
The Navigation Form will appear: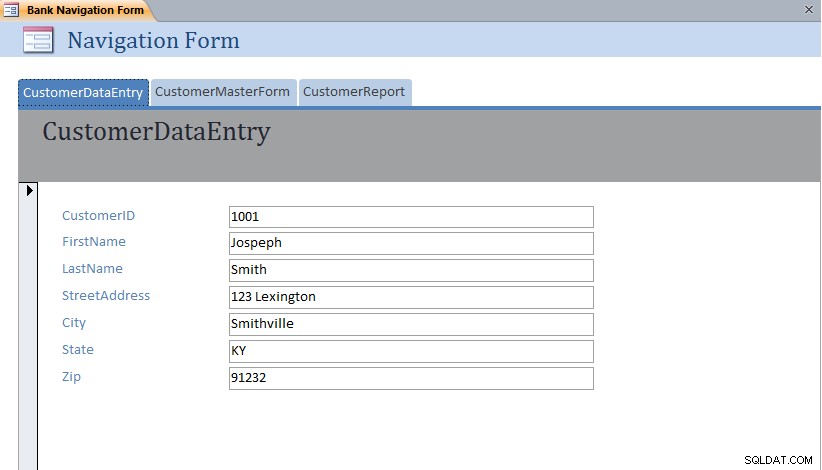 Note that each form or report can be displayed simply by clicking on the different tabs across the top of the Navigation Form.
11.1 Exercise:Modifying a Navigation Form
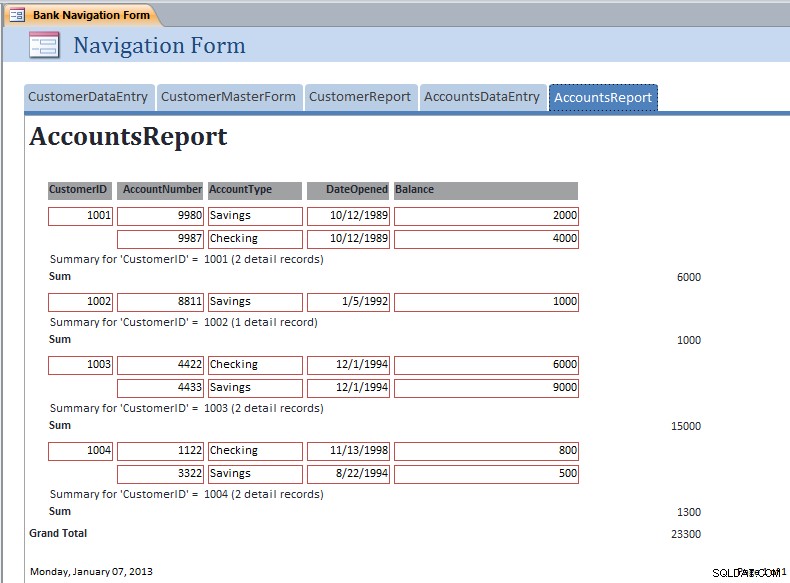
For this exercise, edit the Bank Navigation Form in Layout View and add the following new items to the Navigation Form:
- AccountsDataEntry
- AccountsReport
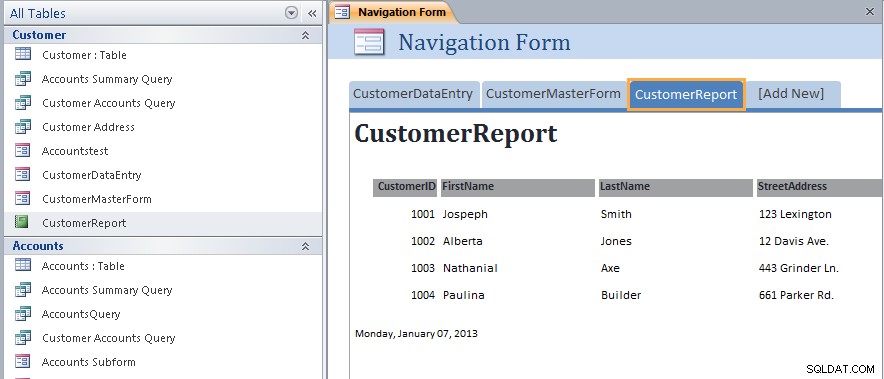
The resulting Navigation Form should appear as below with the AccountsReport opened:
11.2 Setting the Navigation Form as the Default
MS Access 2007 and 2010 (as well as earlier versions) have the ability to set a default form that will open up automatically once the MS Access data file is opened. This is especially useful for end users so that they always see the same form when they open up the database.
To set the Default Form, pull down the File menu and select the Options menu item.

The Database Options form will appear. Click on the Current Database item on the left hand side.
Under the Application Options heading, look for the Display Form:prompt and set this to the Bank Navigation Form as shown below:
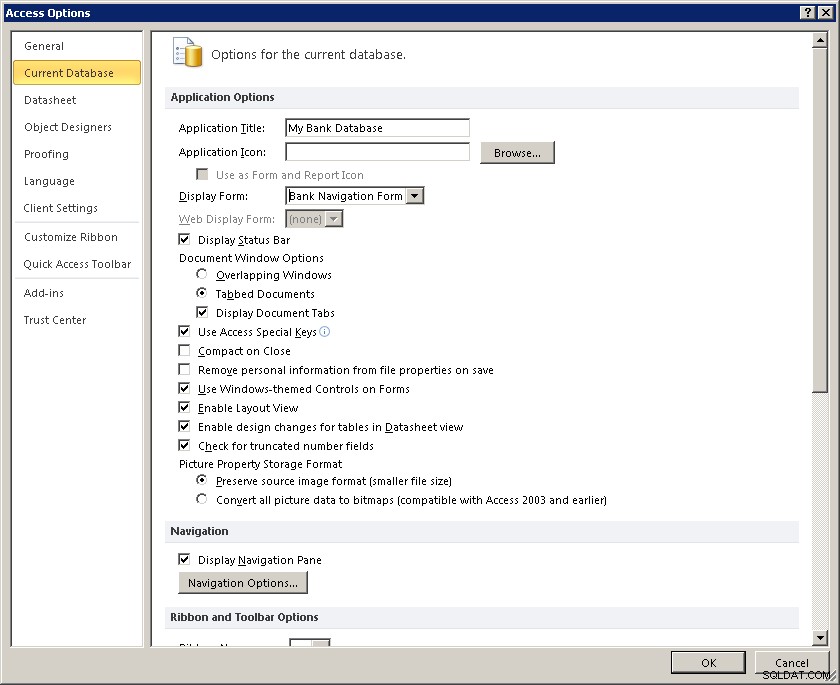
Click on the OK button to close up the Database Options screen.
The next time this database (bankdb.accdb) is opened, the Bank Navigation Form will open up.
12 Tutorial Summary
In this tutorial, we have covered the basics for creating an Access database including tables with data, queries to retrieve data, forms to enter data and reports to display and summarize data.
Students are encouraged to further their Access knowledge and skills by working through more advanced tutorials such as Advanced Access Database Table Design and Advanced Access Forms Design, and by reading the on-line help and Access documentation.
You may also be interested in this tutorial that covers up-sizing the Access database to Microsoft SQL Server using the Microsoft SQL Server Migration Assistant.