Všechny programy zpracovávají data v té či oné podobě a mnohé z nich potřebují být schopny tato data ukládat a načítat z jednoho vyvolání do druhého. Python, SQLite a SQLAlchemy poskytují vašim programům databázovou funkčnost a umožňují vám ukládat data do jednoho souboru bez potřeby databázového serveru.
Podobných výsledků můžete dosáhnout pomocí plochých souborů v libovolném počtu formátů, včetně CSV, JSON, XML a dokonce i vlastních formátů. Ploché soubory jsou často textové soubory čitelné pro člověka – ačkoli to mohou být také binární data – se strukturou, kterou lze analyzovat počítačovým programem. Níže prozkoumáte použití databází SQL a plochých souborů pro ukládání a manipulaci s daty a naučíte se, jak se rozhodnout, který přístup je pro váš program vhodný.
V tomto kurzu se naučíte používat:
- Jednoduché soubory pro ukládání dat
- SQL zlepšit přístup k perzistentním datům
- SQLite pro ukládání dat
- SQLAlchemy pracovat s daty jako s objekty Pythonu
Veškerý kód a data, která uvidíte v tomto tutoriálu, získáte kliknutím na odkaz níže:
Stáhněte si ukázkový kód: Kliknutím sem získáte kód, pomocí kterého se v tomto kurzu dozvíte o správě dat pomocí SQLite a SQLAlchemy.
Použití plochých souborů pro ukládání dat
jednoduchý soubor je soubor obsahující data bez vnitřní hierarchie a obvykle bez odkazů na externí soubory. Ploché soubory obsahují znaky čitelné pro člověka a jsou velmi užitečné pro vytváření a čtení dat. Protože nemusejí používat pevné šířky polí, ploché soubory často používají jiné struktury, které programu umožňují analyzovat text.
Například soubory CSV (comma-separated value) jsou řádky prostého textu, ve kterých znak čárka odděluje datové prvky. Každý řádek textu představuje řádek dat a každá hodnota oddělená čárkou je pole v tomto řádku. Oddělovač znaků čárka označuje hranici mezi datovými hodnotami.
Python vyniká ve čtení a ukládání do souborů. Schopnost číst datové soubory pomocí Pythonu vám umožňuje obnovit aplikaci do užitečného stavu, když ji později znovu spustíte. Možnost ukládat data do souboru vám umožňuje sdílet informace z programu mezi uživateli a weby, kde aplikace běží.
Než může program číst datový soubor, musí být schopen datům porozumět. Obvykle to znamená, že datový soubor musí mít nějakou strukturu, kterou může aplikace použít ke čtení a analýze textu v souboru.
Níže je soubor CSV s názvem author_book_publisher.csv , který používá první ukázkový program v tomto tutoriálu:
first_name,last_name,title,publisher
Isaac,Asimov,Foundation,Random House
Pearl,Buck,The Good Earth,Random House
Pearl,Buck,The Good Earth,Simon & Schuster
Tom,Clancy,The Hunt For Red October,Berkley
Tom,Clancy,Patriot Games,Simon & Schuster
Stephen,King,It,Random House
Stephen,King,It,Penguin Random House
Stephen,King,Dead Zone,Random House
Stephen,King,The Shining,Penguin Random House
John,Le Carre,"Tinker, Tailor, Soldier, Spy: A George Smiley Novel",Berkley
Alex,Michaelides,The Silent Patient,Simon & Schuster
Carol,Shaben,Into The Abyss,Simon & Schuster
První řádek obsahuje seznam polí oddělených čárkami, což jsou názvy sloupců pro data, která následují na zbývajících řádcích. Zbývající řádky obsahují data, přičemž každý řádek představuje jeden záznam.
Poznámka: Ačkoli jsou autoři, knihy a vydavatelé skuteční, vztahy mezi knihami a vydavateli jsou fiktivní a byly vytvořeny pro účely tohoto tutoriálu.
Dále se podíváte na některé výhody a nevýhody používání plochých souborů, jako je výše uvedený CSV, pro práci s vašimi daty.
Výhody plochých souborů
Práce s daty v plochých souborech je zvládnutelná a snadno implementovatelná. Mít data ve formátu čitelném pro člověka je užitečné nejen pro vytváření datového souboru pomocí textového editoru, ale také pro zkoumání dat a hledání jakýchkoli nesrovnalostí nebo problémů.
Mnoho aplikací dokáže exportovat ploché verze dat generovaných souborem. Excel může například importovat nebo exportovat soubor CSV do a z tabulky. Ploché soubory mají také výhodu, že jsou samostatné a přenositelné, pokud chcete data sdílet.
Téměř každý programovací jazyk má nástroje a knihovny, které usnadňují práci se soubory CSV. Python má vestavěný csv k dispozici modul a výkonný modul pandas, díky čemuž je práce se soubory CSV účinným řešením.
Nevýhody plochých souborů
Výhody práce s plochými soubory se začínají snižovat, jak se data zvětšují. Velké soubory jsou stále čitelné pro člověka, ale jejich úprava za účelem vytvoření dat nebo hledání problémů se stává obtížnějším úkolem. Pokud vaše aplikace změní data v souboru, pak by jedním řešením bylo načíst celý soubor do paměti, provést změny a zapsat data do jiného souboru.
Dalším problémem s používáním plochých souborů je to, že budete muset explicitně vytvořit a udržovat jakékoli vztahy mezi částmi vašich dat a aplikačním programem v rámci syntaxe souboru. Kromě toho budete muset ve své aplikaci vygenerovat kód, abyste mohli tyto vztahy používat.
Poslední komplikací je, že lidé, se kterými chcete svůj datový soubor sdílet, budou také muset vědět o strukturách a vztazích, které jste v datech vytvořili, a jednat podle nich. Pro přístup k informacím budou tito uživatelé muset rozumět nejen struktuře dat, ale také programovacím nástrojům nezbytným pro přístup k nim.
Příklad plochého souboru
Ukázkový program examples/example_1/main.py používá author_book_publisher.csv získat data a vztahy v něm. Tento soubor CSV obsahuje seznam autorů, knih, které publikovali, a vydavatelů pro každou z knih.
Poznámka: Datové soubory použité v příkladech jsou k dispozici v project/data adresář. V project/build_data je také soubor programu adresář, který generuje data. Tato aplikace je užitečná, pokud změníte data a chcete se vrátit do známého stavu.
Chcete-li získat přístup k datovým souborům použitým v této části a v celém tutoriálu, klikněte na odkaz níže:
Stáhněte si ukázkový kód: Kliknutím sem získáte kód, pomocí kterého se v tomto kurzu dozvíte o správě dat pomocí SQLite a SQLAlchemy.
Výše uvedený soubor CSV je poměrně malý datový soubor obsahující pouze několik autorů, knih a vydavatelů. Měli byste si také všimnout některých věcí o datech:
-
Autoři Stephen King a Tom Clancy se objevují více než jednou, protože v datech je zastoupeno více knih, které publikovali.
-
Autoři Stephen King a Pearl Buck vydali stejnou knihu u více než jednoho vydavatele.
Tato duplikovaná datová pole vytvářejí vztahy mezi ostatními částmi dat. Jeden autor může napsat mnoho knih a jeden vydavatel může pracovat s více autory. Autoři a vydavatelé sdílejí vztahy s jednotlivými knihami.
Vztahy v souboru author_book_publisher.csv jsou reprezentovány poli, která se objevují vícekrát v různých řádcích datového souboru. Kvůli této redundanci dat představují data více než jednu dvourozměrnou tabulku. Více toho uvidíte, když soubor použijete k vytvoření databázového souboru SQLite.
Ukázkový program examples/example_1/main.py používá vztahy vložené do souboru author_book_publisher.csv soubor pro vygenerování některých dat. Nejprve uvádí seznam autorů a počet knih, které každý napsal. Poté se zobrazí seznam vydavatelů a počet autorů, pro které každý vydal knihy.
Používá také treelib modul pro zobrazení stromové hierarchie autorů, knih a vydavatelů.
Nakonec přidá k datům novou knihu a znovu zobrazí stromovou hierarchii s novou knihou na svém místě. Zde je main() funkce vstupního bodu pro tento program:
 1def main():
 2    """The main entry point of the program"""
 3    # Get the resources for the program
 4    with resources.path(
 5        "project.data", "author_book_publisher.csv"
 6    ) as filepath:
 7        data = get_data(filepath)
 8
 9    # Get the number of books printed by each publisher
10    books_by_publisher = get_books_by_publisher(data, ascending=False)
11    for publisher, total_books in books_by_publisher.items():
12        print(f"Publisher: {publisher}, total books: {total_books}")
13    print()
14
15    # Get the number of authors each publisher publishes
16    authors_by_publisher = get_authors_by_publisher(data, ascending=False)
17    for publisher, total_authors in authors_by_publisher.items():
18        print(f"Publisher: {publisher}, total authors: {total_authors}")
19    print()
20
21    # Output hierarchical authors data
22    output_author_hierarchy(data)
23
24    # Add a new book to the data structure
25    data = add_new_book(
26        data,
27        author_name="Stephen King",
28        book_title="The Stand",
29        publisher_name="Random House",
30    )
31
32    # Output the updated hierarchical authors data
33    output_author_hierarchy(data)
Výše uvedený kód Pythonu má následující kroky:
- Řádky 4 až 7 přečtěte si
author_book_publisher.csvsoubor do pandas DataFrame. - Řádky 10 až 13 vytisknout počet knih vydaných každým vydavatelem.
- Řádky 16 až 19 vytisknout počet autorů spojených s každým vydavatelem.
- Řádek 22 vydává data knihy jako hierarchii seřazenou podle autorů.
- Řádky 25 až 30 přidat novou knihu do struktury v paměti.
- Řádek 33 vypíše data knihy jako hierarchii seřazenou podle autorů, včetně nově přidané knihy.
Spuštění tohoto programu vygeneruje následující výstup:
$ python main.py
Publisher: Simon & Schuster, total books: 4
Publisher: Random House, total books: 4
Publisher: Penguin Random House, total books: 2
Publisher: Berkley, total books: 2

Publisher: Simon & Schuster, total authors: 4
Publisher: Random House, total authors: 3
Publisher: Berkley, total authors: 2
Publisher: Penguin Random House, total authors: 1

Authors
├── Alex Michaelides
│   └── The Silent Patient
│       └── Simon & Schuster
├── Carol Shaben
│   └── Into The Abyss
│       └── Simon & Schuster
├── Isaac Asimov
│   └── Foundation
│       └── Random House
├── John Le Carre
│   └── Tinker, Tailor, Soldier, Spy: A George Smiley Novel
│       └── Berkley
├── Pearl Buck
│   └── The Good Earth
│       ├── Random House
│       └── Simon & Schuster
├── Stephen King
│   ├── Dead Zone
│   │   └── Random House
│   ├── It
│   │   ├── Penguin Random House
│   │   └── Random House
│   └── The Shining
│       └── Penguin Random House
└── Tom Clancy
    ├── Patriot Games
    │   └── Simon & Schuster
    └── The Hunt For Red October
        └── Berkley
Výše uvedená autorská hierarchie je ve výstupu uvedena dvakrát, s přidáním The Stand od Stephena Kinga , kterou vydalo nakladatelství Random House. Skutečný výstup výše byl upraven a zobrazuje pouze výstup první hierarchie, aby se ušetřilo místo.
main() volá další funkce, aby provedly většinu práce. První funkce, kterou volá, je get_data() :
def get_data(filepath):
    """Get book data from the csv file"""
    return pd.read_csv(filepath)
Tato funkce převezme cestu k souboru CSV a pomocí pand ji načte do datového rámce pandas, který pak předá zpět volajícímu. Návratová hodnota této funkce se stává datovou strukturou předávanou ostatním funkcím, které tvoří program.
get_books_by_publisher() vypočítává počet knih vydaných každým vydavatelem. Výsledná řada pand využívá funkci GroupBy pandy k seskupení podle vydavatele a následnému řazení na základě ascending příznak:
def get_books_by_publisher(data, ascending=True):
    """Return the number of books by each publisher as a pandas series"""
    return data.groupby("publisher").size().sort_values(ascending=ascending)
get_authors_by_publisher() dělá v podstatě to samé jako předchozí funkce, ale pro autory:
def get_authors_by_publisher(data, ascending=True):
    """Returns the number of authors by each publisher as a pandas series"""
    return (
        data.assign(name=data.first_name.str.cat(data.last_name, sep=" "))
        .groupby("publisher")
        .nunique()
        .loc[:, "name"]
        .sort_values(ascending=ascending)
    )
add_new_book() vytvoří novou knihu v pandas DataFrame. Kód zkontroluje, zda autor, kniha nebo vydavatel již existuje. Pokud ne, vytvoří novou knihu a připojí ji k datovému rámci pandas:
def add_new_book(data, author_name, book_title, publisher_name):
    """Adds a new book to the system"""
    # Does the book exist?
    first_name, _, last_name = author_name.partition(" ")
    if any(
        (data.first_name == first_name)
        & (data.last_name == last_name)
        & (data.title == book_title)
        & (data.publisher == publisher_name)
    ):
        return data
    # Add the new book
    return data.append(
        {
            "first_name": first_name,
            "last_name": last_name,
            "title": book_title,
            "publisher": publisher_name,
        },
        ignore_index=True,
    )
output_author_hierarchy() používá vnořené for smyčky pro iteraci úrovněmi datové struktury. Poté používá treelib modul pro výstup hierarchického seznamu autorů, knih, které vydali, a vydavatelů, kteří tyto knihy vydali:
def output_author_hierarchy(data):
    """Output the data as a hierarchy list of authors"""
    authors = data.assign(
        name=data.first_name.str.cat(data.last_name, sep=" ")
    )
    authors_tree = Tree()
    authors_tree.create_node("Authors", "authors")
    for author, books in authors.groupby("name"):
        authors_tree.create_node(author, author, parent="authors")
        for book, publishers in books.groupby("title")["publisher"]:
            book_id = f"{author}:{book}"
            authors_tree.create_node(book, book_id, parent=author)
            for publisher in publishers:
                authors_tree.create_node(publisher, parent=book_id)

    # Output the hierarchical authors data
    authors_tree.show()
Tato aplikace funguje dobře a ilustruje výkon, který máte k dispozici s modulem pandas. Modul poskytuje vynikající funkčnost pro čtení souboru CSV a interakci s daty.
Pojďme dál a vytvořme identicky fungující program využívající Python, SQLite databázovou verzi dat autora a publikace, a SQLAlchemy pro interakci s těmito daty.
Používání SQLite k zachování dat
Jak jste viděli dříve, v souboru author_book_publisher.csv jsou nadbytečná data soubor. Například všechny informace o The Good Earth od Pearl Buck je uveden dvakrát, protože knihu vydali dvě různá vydavatelství.
Představte si, že by tento datový soubor obsahoval více souvisejících dat, jako je adresa a telefonní číslo autora, data vydání a čísla ISBN knih nebo adresy, telefonní čísla a možná roční příjmy vydavatelů. Tato data by byla duplikována pro každou kořenovou datovou položku, jako je autor, kniha nebo vydavatel.
Je možné vytvářet data tímto způsobem, ale bylo by to výjimečně nepraktické. Přemýšlejte o problémech s udržováním aktuálního datového souboru. Co kdyby si chtěl Stephen King změnit jméno? Budete muset aktualizovat několik záznamů obsahujících jeho jméno a ujistit se, že tam nejsou žádné překlepy.
Horší než duplikace dat by byla složitost přidávání dalších vztahů k datům. Co kdybyste se rozhodli přidat telefonní čísla na autory a oni měli telefonní čísla domů, do práce, na mobil a možná i další? Každý nový vztah, který byste chtěli přidat pro jakoukoli kořenovou položku, by vynásobil počet záznamů počtem položek v tomto novém vztahu.
Tento problém je jedním z důvodů, proč v databázových systémech existují vztahy. Důležitým tématem v databázovém inženýrství je normalizace databáze nebo proces rozdělování dat za účelem snížení redundance a zvýšení integrity. Když se struktura databáze rozšíří o nové typy dat, její předchozí normalizace udrží změny ve stávající struktuře na minimu.
Databáze SQLite je dostupná v Pythonu a podle domovské stránky SQLite se používá více než všechny ostatní databázové systémy dohromady. Nabízí plně vybavený systém pro správu relačních databází (RDBMS), který pracuje s jediným souborem a udržuje všechny funkce databáze.
Má také výhodu, že ke své činnosti nevyžaduje samostatný databázový server. Formát databázového souboru je multiplatformní a dostupný pro jakýkoli programovací jazyk, který podporuje SQLite.
To vše jsou zajímavé informace, ale jak to souvisí s používáním plochých souborů pro ukládání dat? To se dozvíte níže!
Vytvoření struktury databáze
Přístup hrubou silou k získání souboru author_book_publisher.csv data do databáze SQLite by bylo vytvoření jediné tabulky odpovídající struktuře CSV souboru. Tím by se ignorovala velká část výkonu SQLite.
Relační databáze poskytují způsob, jak ukládat strukturovaná data do tabulek a vytvářet vztahy mezi těmito tabulkami. Obvykle používají SQL (Structured Query Language) jako primární způsob interakce s daty. Toto je přílišné zjednodušení toho, co poskytují RDBMS, ale pro účely tohoto tutoriálu je to dostačující.
Databáze SQLite poskytuje podporu pro interakci s datovou tabulkou pomocí SQL. Databázový soubor SQLite nejenže obsahuje data, ale má také standardizovaný způsob interakce s daty. Tato podpora je součástí souboru, což znamená, že jakýkoli programovací jazyk, který může používat soubor SQLite, může pro práci s ním používat také SQL.
Interakce s databází pomocí SQL
SQL je deklarativní jazyk slouží k vytváření, správě a dotazování na data obsažená v databázi. Deklarativní jazyk popisuje co má být dosaženo spíše než jak mělo by to být splněno. Příklady příkazů SQL uvidíte později, až se dostanete k vytváření databázových tabulek.
Strukturování databáze pomocí SQL
Chcete-li využít sílu SQL, budete muset použít určitou normalizaci databáze na data v souboru author_book_publisher.csv soubor. Chcete-li to provést, rozdělíte autory, knihy a vydavatele do samostatných databázových tabulek.
Koncepčně jsou data v databázi uložena ve dvourozměrných tabulkových strukturách. Každá tabulka se skládá z řádků záznamů a každý záznam se skládá ze sloupců nebo polí , obsahující data.
Data obsažená v polích jsou předdefinovaných typů, včetně textu, celých čísel, plovoucích a dalších. Soubory CSV se liší, protože všechna pole jsou textová a musí být analyzována programem, aby jim byl přiřazen datový typ.
Každý záznam v tabulce má primární klíč definována tak, aby přidělovala záznamu jedinečný identifikátor. Primární klíč je podobný klíči ve slovníku Pythonu. Databázový stroj sám často generuje primární klíč jako zvyšující se celočíselnou hodnotu pro každý záznam vložený do databázové tabulky.
Ačkoli primární klíč je často automaticky generován databázovým strojem, nemusí tomu tak být. Pokud jsou data uložená v poli jedinečná napříč všemi ostatními daty v tabulce v tomto poli, může to být primární klíč. Například tabulka obsahující data o knihách může jako primární klíč používat ISBN knihy.
Vytváření tabulek pomocí SQL
Zde je návod, jak vytvořit tři tabulky představující autory, knihy a vydavatele v souboru CSV pomocí příkazů SQL:
CREATE TABLE author (
    author_id INTEGER NOT NULL PRIMARY KEY,
    first_name VARCHAR,
    last_name VARCHAR
);

CREATE TABLE book (
    book_id INTEGER NOT NULL PRIMARY KEY,
    author_id INTEGER REFERENCES author,
    title VARCHAR
);

CREATE TABLE publisher (
    publisher_id INTEGER NOT NULL PRIMARY KEY,
    name VARCHAR
);
Všimněte si, že neexistují žádné operace se soubory, nejsou vytvořeny žádné proměnné ani struktury, které by je uchovávaly. Příkazy popisují pouze požadovaný výsledek:vytvoření tabulky s konkrétními atributy. Databázový stroj určuje, jak to provést.
Jakmile vytvoříte a naplníte tuto tabulku daty autora z author_book_publisher.csv soubor, můžete k němu přistupovat pomocí příkazů SQL. Následující prohlášení (nazývané také dotaz ) používá zástupný znak (* ), abyste získali všechna data v author tabulku a vytiskněte ji:
SELECT * FROM author;
Můžete použít sqlite3 nástroj příkazového řádku pro interakci s author_book_publisher.db databázový soubor v project/data adresář:
$ sqlite3 author_book_publisher.db
Jakmile je spuštěn nástroj příkazového řádku SQLite s otevřenou databází, můžete zadávat příkazy SQL. Zde je výše uvedený příkaz SQL a jeho výstup, za nímž následuje .q příkaz k ukončení programu:
sqlite> SELECT * FROM author;
1|Isaac|Asimov
2|Pearl|Buck
3|Tom|Clancy
4|Stephen|King
5|John|Le Carre
6|Alex|Michaelides
7|Carol|Shaben

sqlite> .q
Všimněte si, že každý autor existuje v tabulce pouze jednou. Na rozdíl od souboru CSV, který obsahoval více záznamů pro některé z autorů, je zde nutný pouze jeden jedinečný záznam na každého autora.
Údržba databáze pomocí SQL
SQL poskytuje způsoby práce se stávajícími databázemi a tabulkami vložením nových dat a aktualizací nebo odstraněním existujících dat. Zde je příklad SQL příkazu pro vložení nového autora do author tabulka:
INSERT INTO author
    (first_name, last_name)
VALUES ('Paul', 'Mendez');
Tento příkaz SQL vkládá hodnoty ‘Paul “ a „Mendez ‘ do příslušných sloupců first_name a last_name author stůl.
Všimněte si, že author_id sloupec není určen. Protože tento sloupec je primární klíč, databázový stroj vygeneruje hodnotu a vloží ji jako součást provádění příkazu.
Aktualizace záznamů v databázové tabulce je nekomplikovaný proces. Předpokládejme například, že Stephen King chtěl být známý pod svým pseudonymem Richard Bachman. Zde je příkaz SQL pro aktualizaci záznamu databáze:
UPDATE author
SET first_name = 'Richard', last_name = 'Bachman'
WHERE first_name = 'Stephen' AND last_name = 'King';
Příkaz SQL vyhledá jeden záznam pro 'Stephen King' pomocí podmíněného příkazu WHERE first_name = 'Stephen' AND last_name = 'King' a poté aktualizuje first_name a last_name pole s novými hodnotami. SQL používá rovnítko (= ) jako operátor porovnání i operátor přiřazení.
Můžete také odstranit záznamy z databáze. Zde je příklad příkazu SQL pro odstranění záznamu od author tabulka:
DELETE FROM author
WHERE first_name = 'Paul'
AND last_name = 'Mendez';
Tento příkaz SQL odstraní jeden řádek z author tabulka, kde je first_name je rovno 'Paul' a last_name se rovná 'Mendez' .
Buďte opatrní při mazání záznamů! Podmínky, které nastavíte, musí být co nejkonkrétnější. Příliš široká podmínka může vést k odstranění více záznamů, než zamýšlíte. Pokud by například podmínka byla založena pouze na řádku first_name = 'Paul' , pak budou všichni autoři s křestním jménem Paul vymazáni z databáze.
Poznámka: Aby se zabránilo náhodnému smazání záznamů, mnoho aplikací mazání vůbec neumožňuje. Místo toho má záznam další sloupec, který označuje, zda se používá nebo ne. Tento sloupec může mít název active a obsahují hodnotu, která je vyhodnocena jako True nebo False, což značí, zda má být záznam zahrnut při dotazování na databázi.
Například dotaz SQL níže by získal všechny sloupce pro všechny aktivní záznamy v some_table :
SELECT
  *
FROM some_table
WHERE active = 1;
SQLite nemá datový typ Boolean, takže active sloupec je reprezentován celým číslem s hodnotou 0 nebo 1 k označení stavu záznamu. Jiné databázové systémy mohou, ale nemusí mít nativní booleovské datové typy.
Je zcela možné vytvářet databázové aplikace v Pythonu pomocí příkazů SQL přímo v kódu. Pokud tak učiníte, vrátí se data do aplikace jako seznam seznamů nebo seznam slovníků.
Použití nezpracovaného SQL je naprosto přijatelný způsob práce s daty vrácenými dotazy do databáze. Místo toho však přejdete přímo k používání SQLAlchemy pro práci s databázemi.
Budování vztahů
Další funkcí databázových systémů, kterou můžete považovat za ještě výkonnější a užitečnější než uchovávání a načítání dat, jsou vztahy . Databáze, které podporují vztahy, umožňují rozdělit data do více tabulek a vytvořit mezi nimi spojení.
Údaje v souboru author_book_publisher.csv soubor reprezentuje data a vztahy duplikováním dat. Databáze to řeší rozdělením dat do tří tabulek – author , book a publisher —a navázání vztahů mezi nimi.
Po získání všech požadovaných dat na jedno místo v souboru CSV, proč je chtít rozdělit do více tabulek? Nebylo by více práce vytvořit a znovu poskládat? To je do jisté míry pravda, ale výhody rozbití dat a jejich sestavení pomocí SQL by vás mohly získat!
Vztahy jeden k mnoha
jeden k mnoha vztah je jako vztah zákazníka, který si objednává zboží online. Jeden zákazník může mít mnoho objednávek, ale každá objednávka patří jednomu zákazníkovi. Soubor author_book_publisher.db databáze má vztah one-to-many ve formě autorů a knih. Každý autor může napsat mnoho knih, ale každou knihu napsal jeden autor.
Jak jste viděli ve vytvoření tabulky výše, implementace těchto samostatných entit spočívá v umístění každé do databázové tabulky, jedné pro autory a druhé pro knihy. Ale jak se implementuje vztah one-to-many mezi těmito dvěma tabulkami?
Pamatujte, že každá tabulka v databázi má pole určené jako primární klíč pro danou tabulku. Každá výše uvedená tabulka má pole primárního klíče pojmenované podle tohoto vzoru:<table name>_id .
book výše uvedená tabulka obsahuje pole author_id , který odkazuje na author stůl. author_id pole vytváří vztah jedna k mnoha mezi autory a knihami, který vypadá takto:
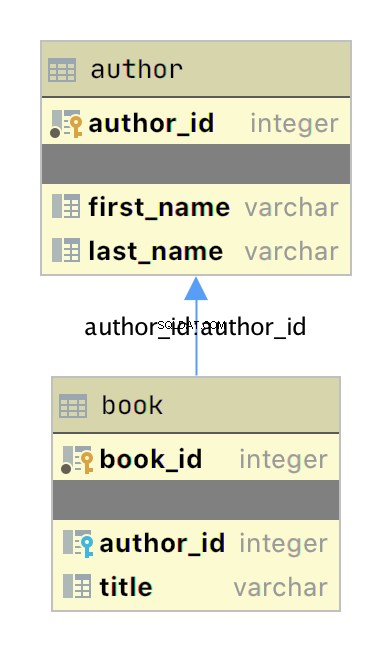
Výše uvedený diagram je jednoduchý diagram vztahů mezi entitami (ERD) vytvořený pomocí aplikace JetBrains DataGrip zobrazující tabulky author a book jako boxy s jejich příslušným primárním klíčem a datovými poli. Dva grafické položky přidávají informace o vztahu:
-
Malé žluté a modré ikony tlačítek uveďte primární a cizí klíč pro tabulku.
-
Šipka spojující
booknaauthoroznačuje vztah mezi tabulkami na základěauthor_idcizí klíč vbooktabulka.
Když do book přidáte novou knihu data obsahují author_id hodnotu pro existujícího autora v author stůl. Tímto způsobem mají všechny knihy napsané autorem vyhledávací vztah zpět k tomuto jedinečnému autorovi.
Nyní, když máte samostatné tabulky pro autory a knihy, jak využíváte vztah mezi nimi? SQL podporuje to, co se nazývá JOIN operaci, kterou můžete databázi sdělit, jak propojit dvě nebo více tabulek.
Dotaz SQL níže připojí author a book tabulky společně pomocí aplikace příkazového řádku SQLite:
sqlite> SELECT
   ...> a.first_name || ' ' || a.last_name AS author_name,
   ...> b.title AS book_title
   ...> FROM author a
   ...> JOIN book b ON b.author_id = a.author_id
   ...> ORDER BY a.last_name ASC;
Isaac Asimov|Foundation
Pearl Buck|The Good Earth
Tom Clancy|The Hunt For Red October
Tom Clancy|Patriot Games
Stephen King|It
Stephen King|Dead Zone
Stephen King|The Shining
John Le Carre|Tinker, Tailor, Soldier, Spy: A George Smiley Novel
Alex Michaelides|The Silent Patient
Carol Shaben|Into The Abyss
Dotaz SQL výše shromažďuje informace z tabulky autora i knihy spojením tabulek pomocí vztahu vytvořeného mezi těmito dvěma. Zřetězení řetězců SQL přiřadí celé jméno autora k aliasu author_name . Data shromážděná dotazem jsou řazena vzestupně podle last_name pole.
V příkazu SQL je třeba si všimnout několika věcí. Nejprve jsou autoři uvedeni celými jmény v jednom sloupci a seřazeni podle příjmení. Autoři se také objevují ve výstupu vícekrát kvůli vztahu jeden k mnoha. Jméno autora je duplikováno pro každou knihu, kterou zapsal do databáze.
Vytvořením samostatných tabulek pro autory a knihy a vytvořením vztahu mezi nimi jste snížili nadbytečnost dat. Nyní stačí upravit data autora na jednom místě a tato změna se projeví v každém dotazu SQL, který k datům přistupuje.
Vztahy mnoho k mnoha
Mnoho-mnoho vztahy existují v author_book_publisher.db databáze mezi autory a vydavateli i mezi knihami a vydavateli. Jeden autor může spolupracovat s mnoha vydavateli a jeden vydavatel může spolupracovat s mnoha autory. Podobně může být jedna kniha vydána mnoha vydavateli a jeden vydavatel může vydat mnoho knih.
Zpracování této situace v databázi je složitější než vztah jeden k mnoha, protože vztah jde oběma směry. Many-to-many relationships are created by an association table acting as a bridge between the two related tables.
The association table contains at least two foreign key fields, which are the primary keys of each of the two associated tables. This SQL statement creates the association table relating the author and publisher tables:
CREATE TABLE author_publisher (
    author_id INTEGER REFERENCES author,
    publisher_id INTEGER REFERENCES publisher
);
The SQL statements create a new author_publisher table referencing the primary keys of the existing author and publisher tabulky. The author_publisher table is an association table establishing relationships between an author and a publisher.
Because the relationship is between two primary keys, there’s no need to create a primary key for the association table itself. The combination of the two related keys creates a unique identifier for a row of data.
As before, you use the JOIN keyword to connect two tables together. Connecting the author table to the publisher table is a two-step process:
JOINtheauthortable with theauthor_publisherstůl.JOINtheauthor_publishertable with thepublishertable.
The author_publisher association table provides the bridge through which the JOIN connects the two tables. Here’s an example SQL query returning a list of authors and the publishers publishing their books:
 1sqlite> SELECT
 2   ...> a.first_name || ' ' || a.last_name AS author_name,
 3   ...> p.name AS publisher_name
 4   ...> FROM author a
 5   ...> JOIN author_publisher ap ON ap.author_id = a.author_id
 6   ...> JOIN publisher p ON p.publisher_id = ap.publisher_id
 7   ...> ORDER BY a.last_name ASC;
 8Isaac Asimov|Random House
 9Pearl Buck|Random House
10Pearl Buck|Simon & Schuster
11Tom Clancy|Berkley
12Tom Clancy|Simon & Schuster
13Stephen King|Random House
14Stephen King|Penguin Random House
15John Le Carre|Berkley
16Alex Michaelides|Simon & Schuster
17Carol Shaben|Simon & Schuster
The statements above perform the following actions:
-
Line 1 starts a
SELECTstatement to get data from the database. -
Line 2 selects the first and last name from the
authortable using theaalias for theauthortable and concatenates them together with a space character. -
Line 3 selects the publisher’s name aliased to
publisher_name. -
Line 4 uses the
authortable as the first source from which to retrieve data and assigns it to the aliasa. -
Line 5 is the first step of the process outlined above for connecting the
authortable to thepublisherstůl. It uses the aliasapfor theauthor_publisherassociation table and performs aJOINoperation to connect theap.author_idforeign key reference to thea.author_idprimary key in theauthortabulka. -
Line 6 is the second step in the two-step process mentioned above. It uses the alias
pfor thepublishertable and performs aJOINoperation to relate theap.publisher_idforeign key reference to thep.publisher_idprimary key in thepublishertabulka. -
Line 7 sorts the data by the author’s last name in ascending alphabetical order and ends the SQL query.
-
Lines 8 to 17 are the output of the SQL query.
Note that the data in the source author and publisher tables are normalized, with no data duplication. Yet the returned results have duplicated data where necessary to answer the SQL query.
The SQL query above demonstrates how to make use of a relationship using the SQL JOIN keyword, but the resulting data is a partial re-creation of the author_book_publisher.csv CSV data. What’s the win for having done the work of creating a database to separate the data?
Here’s another SQL query to show a little bit of the power of SQL and the database engine:
 1sqlite> SELECT
 2   ...> a.first_name || ' ' || a.last_name AS author_name,
 3   ...> COUNT(b.title) AS total_books
 4   ...> FROM author a
 5   ...> JOIN book b ON b.author_id = a.author_id
 6   ...> GROUP BY author_name
 7   ...> ORDER BY total_books DESC, a.last_name ASC;
 8Stephen King|3
 9Tom Clancy|2
10Isaac Asimov|1
11Pearl Buck|1
12John Le Carre|1
13Alex Michaelides|1
14Carol Shaben|1
The SQL query above returns the list of authors and the number of books they’ve written. The list is sorted first by the number of books in descending order, then by the author’s name in alphabetical order:
-
Line 1 begins the SQL query with the
SELECTklíčové slovo. -
Line 2 selects the author’s first and last names, separated by a space character, and creates the alias
author_name. -
Line 3 counts the number of books written by each author, which will be used later by the
ORDER BYclause to sort the list. -
Line 4 selects the
authortable to get data from and creates theaalias. -
Line 5 connects to the related
booktable through aJOINto theauthor_idand creates thebalias for thebooktabulka. -
Line 6 generates the aggregated author and total number of books data by using the
GROUP BYklíčové slovo.GROUP BYis what groups eachauthor_nameand controls what books are tallied byCOUNT()for that author. -
Line 7 sorts the output first by number of books in descending order, then by the author’s last name in ascending alphabetical order.
-
Lines 8 to 14 are the output of the SQL query.
In the above example, you take advantage of SQL to perform aggregation calculations and sort the results into a useful order. Having the database perform calculations based on its built-in data organization ability is usually faster than performing the same kinds of calculations on raw data sets in Python. SQL offers the advantages of using set theory embedded in RDBMS databases.
Entity Relationship Diagrams
An entity-relationship diagram (ERD) is a visual depiction of an entity-relationship model for a database or part of a database. The author_book_publisher.db SQLite database is small enough that the entire database can be visualized by the diagram shown below:
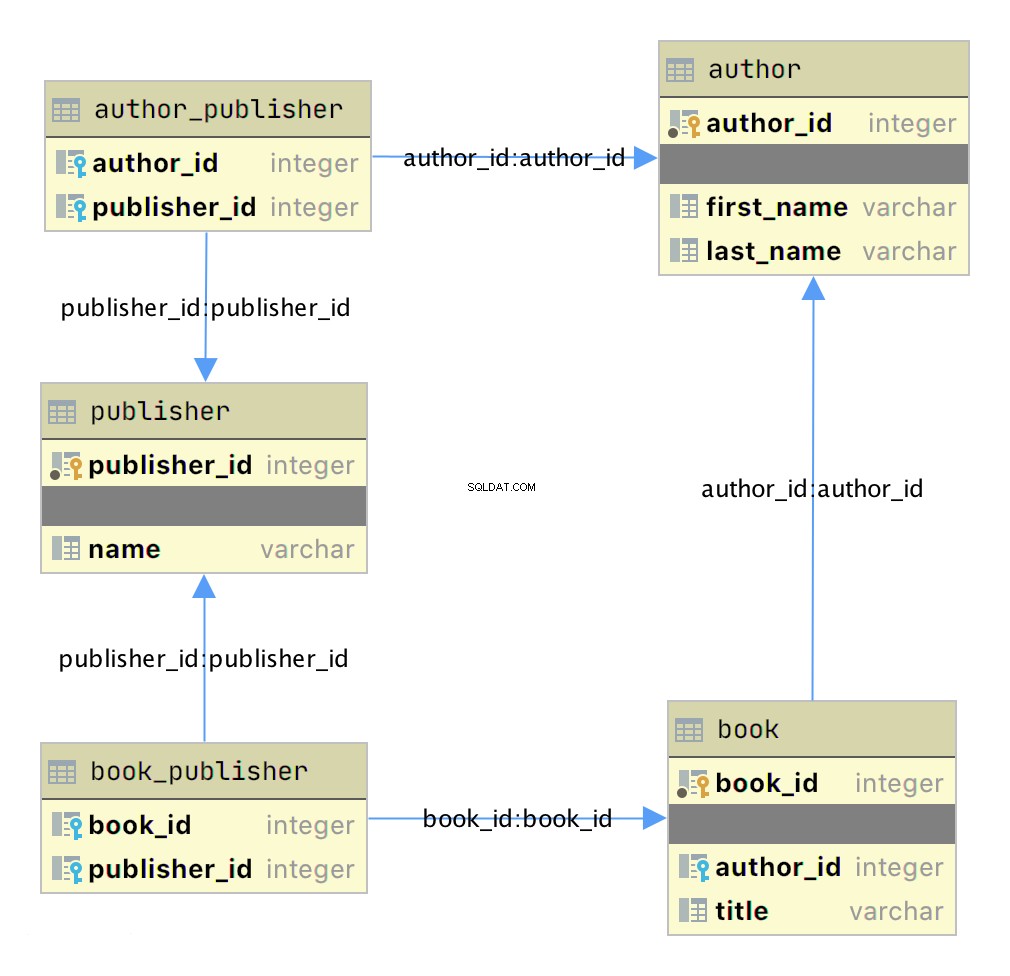
This diagram presents the table structures in the database and the relationships between them. Each box represents a table and contains the fields defined in the table, with the primary key indicated first if it exists.
The arrows show the relationships between the tables connecting a foreign key field in one table to a field, often the primary key, in another table. The table book_publisher has two arrows, one connecting it to the book table and another connecting it to the publisher stůl. The arrow indicates the many-to-many relationship between the book and publisher tabulky. The author_publisher table provides the same relationship between author and publisher .
Working With SQLAlchemy and Python Objects
SQLAlchemy is a powerful database access tool kit for Python, with its object-relational mapper (ORM) being one of its most famous components, and the one discussed and used here.
When you’re working in an object-oriented language like Python, it’s often useful to think in terms of objects. It’s possible to map the results returned by SQL queries to objects, but doing so works against the grain of how the database works. Sticking with the scalar results provided by SQL works against the grain of how Python developers work. This problem is known as object-relational impedance mismatch.
The ORM provided by SQLAlchemy sits between the SQLite database and your Python program and transforms the data flow between the database engine and Python objects. SQLAlchemy allows you to think in terms of objects and still retain the powerful features of a database engine.
The Model
One of the fundamental elements to enable connecting SQLAlchemy to a database is creating a model . The model is a Python class defining the data mapping between the Python objects returned as a result of a database query and the underlying database tables.
The entity-relationship diagram displayed earlier shows boxes connected with arrows. The boxes are the tables built with the SQL commands and are what the Python classes will model. The arrows are the relationships between the tables.
The models are Python classes inheriting from an SQLAlchemy Base class. The Base class provides the interface operations between instances of the model and the database table.
Below is the models.py file that creates the models to represent the author_book_publisher.db database:
 1from sqlalchemy import Column, Integer, String, ForeignKey, Table
 2from sqlalchemy.orm import relationship, backref
 3from sqlalchemy.ext.declarative import declarative_base
 4
 5Base = declarative_base()
 6
 7author_publisher = Table(
 8    "author_publisher",
 9    Base.metadata,
10    Column("author_id", Integer, ForeignKey("author.author_id")),
11    Column("publisher_id", Integer, ForeignKey("publisher.publisher_id")),
12)
13
14book_publisher = Table(
15    "book_publisher",
16    Base.metadata,
17    Column("book_id", Integer, ForeignKey("book.book_id")),
18    Column("publisher_id", Integer, ForeignKey("publisher.publisher_id")),
19)
20
21class Author(Base):
22    __tablename__ = "author"
23    author_id = Column(Integer, primary_key=True)
24    first_name = Column(String)
25    last_name = Column(String)
26    books = relationship("Book", backref=backref("author"))
27    publishers = relationship(
28        "Publisher", secondary=author_publisher, back_populates="authors"
29    )
30
31class Book(Base):
32    __tablename__ = "book"
33    book_id = Column(Integer, primary_key=True)
34    author_id = Column(Integer, ForeignKey("author.author_id"))
35    title = Column(String)
36    publishers = relationship(
37        "Publisher", secondary=book_publisher, back_populates="books"
38    )
39
40class Publisher(Base):
41    __tablename__ = "publisher"
42    publisher_id = Column(Integer, primary_key=True)
43    name = Column(String)
44    authors = relationship(
45        "Author", secondary=author_publisher, back_populates="publishers"
46    )
47    books = relationship(
48        "Book", secondary=book_publisher, back_populates="publishers"
49    )
Here’s what’s going on in this module:
-
Line 1 imports the
Column,Integer,String,ForeignKey, andTableclasses from SQLAlchemy, which are used to help define the model attributes. -
Line 2 imports the
relationship()andbackrefobjects, which are used to create the relationships between objects. -
Line 3 imports the
declarative_baseobject, which connects the database engine to the SQLAlchemy functionality of the models. -
Line 5 creates the
Baseclass, which is what all models inherit from and how they get SQLAlchemy ORM functionality. -
Lines 7 to 12 create the
author_publisherassociation table model. -
Lines 14 to 19 create the
book_publisherassociation table model. -
Lines 21 to 29 define the
Authorclass model to theauthordatabase table. -
Lines 31 to 38 define the
Bookclass model to thebookdatabase table. -
Lines 40 to 49 define the
Publisherclass model to thepublisherdatabase table.
The description above shows the mapping of the five tables in the author_book_publisher.db databáze. But it glosses over some SQLAlchemy ORM features, including Table , ForeignKey , relationship() , and backref . Let’s get into those now.
Table Creates Associations
author_publisher and book_publisher are both instances of the Table class that create the many-to-many association tables used between the author and publisher tables and the book and publisher tables, respectively.
The SQLAlchemy Table class creates a unique instance of an ORM mapped table within the database. The first parameter is the table name as defined in the database, and the second is Base.metadata , which provides the connection between the SQLAlchemy functionality and the database engine.
The rest of the parameters are instances of the Column class defining the table fields by name, their type, and in the example above, an instance of a ForeignKey .
ForeignKey Creates a Connection
The SQLAlchemy ForeignKey class defines a dependency between two Column fields in different tables. A ForeignKey is how you make SQLAlchemy aware of the relationships between tables. For example, this line from the author_publisher instance creation establishes a foreign key relationship:
Column("author_id", Integer, ForeignKey("author.author_id"))
The statement above tells SQLAlchemy that there’s a column in the author_publisher table named author_id . The type of that column is Integer , and author_id is a foreign key related to the primary key in the author tabulka.
Having both author_id and publisher_id defined in the author_publisher Table instance creates the connection from the author table to the publisher table and vice versa, establishing a many-to-many relationship.
relationship() Establishes a Collection
Having a ForeignKey defines the existence of the relationship between tables but not the collection of books an author can have. Take a look at this line in the Author class definition:
books = relationship("Book", backref=backref("author"))
The code above defines a parent-child collection. The books attribute being plural (which is not a requirement, just a convention) is an indication that it’s a collection.
The first parameter to relationship() , the class name Book (which is not the table name book ), is the class to which the books attribute is related. The relationship informs SQLAlchemy that there’s a relationship between the Author and Book classes. SQLAlchemy will find the relationship in the Book class definition:
author_id = Column(Integer, ForeignKey("author.author_id"))
SQLAlchemy recognizes that this is the ForeignKey connection point between the two classes. You’ll get to the backref parameter in relationship() in a moment.
The other relationship in Author is to the Publisher class. This is created with the following statement in the Author class definition:
publishers = relationship(
    "Publisher", secondary=author_publisher, back_populates="authors"
)
Like books , the attribute publishers indicates a collection of publishers associated with an author. The first parameter, "Publisher" , informs SQLAlchemy what the related class is. The second and third parameters are secondary=author_publisher and back_populates="authors" :
-
secondarytells SQLAlchemy that the relationship to thePublisherclass is through a secondary table, which is theauthor_publisherassociation table created earlier inmodels.py. Thesecondaryparameter makes SQLAlchemy find thepublisher_idForeignKeydefined in theauthor_publisherassociation table. -
back_populatesis a convenience configuration telling SQLAlchemy that there’s a complementary collection in thePublisherclass calledauthors.
backref Mirrors Attributes
The backref parameter of the books collection relationship() creates an author attribute for each Book instance. This attribute refers to the parent Author that the Book instance is related to.
For example, if you executed the following Python code, then a Book instance would be returned from the SQLAlchemy query. The Book instance has attributes that can be used to print out information about the book:
book = session.query(Book).filter_by(Book.title == "The Stand").one_or_none()
print(f"Authors name: {book.author.first_name} {book.author.last_name}")
The existence of the author attribute in the Book above is because of the backref definition. A backref can be very handy to have when you need to refer to the parent and all you have is a child instance.
Queries Answer Questions
You can make a basic query like SELECT * FROM author; in SQLAlchemy like this:
results = session.query(Author).all()
The session is an SQLAlchemy object used to communicate with SQLite in the Python example programs. Here, you tell the session you want to execute a query against the Author model and return all records.
At this point, the advantages of using SQLAlchemy instead of plain SQL might not be obvious, especially considering the setup required to create the models representing the database. The results returned by the query is where the magic happens. Instead of getting back a list of lists of scalar data, you’ll get back a list of instances of Author objects with attributes matching the column names you defined.
The books and publishers collections maintained by SQLAlchemy create a hierarchical list of authors and the books they’ve written as well as the publishers who’ve published them.
Behind the scenes, SQLAlchemy turns the object and method calls into SQL statements to execute against the SQLite database engine. SQLAlchemy transforms the data returned by SQL queries into Python objects.
With SQLAlchemy, you can perform the more complex aggregation query shown earlier for the list of authors and the number of books they’ve written like this:
author_book_totals = (
    session.query(
        Author.first_name,
        Author.last_name,
        func.count(Book.title).label("book_total")
    )
    .join(Book)
    .group_by(Author.last_name)
    .order_by(desc("book_total"))
    .all()
)
The query above gets the author’s first and last name, along with a count of the number of books that the author has written. The aggregating count used by the group_by clause is based on the author’s last name. Finally, the results are sorted in descending order based on the aggregated and aliased book_total .
Example Program
The example program examples/example_2/main.py has the same functionality as examples/example_1/main.py but uses SQLAlchemy exclusively to interface with the author_book_publisher.db SQLite database. The program is broken up into the main() function and the functions it calls:
 1def main():
 2    """Main entry point of program"""
 3    # Connect to the database using SQLAlchemy
 4    with resources.path(
 5        "project.data", "author_book_publisher.db"
 6    ) as sqlite_filepath:
 7        engine = create_engine(f"sqlite:///{sqlite_filepath}")
 8    Session = sessionmaker()
 9    Session.configure(bind=engine)
10    session = Session()
11
12    # Get the number of books printed by each publisher
13    books_by_publisher = get_books_by_publishers(session, ascending=False)
14    for row in books_by_publisher:
15        print(f"Publisher: {row.name}, total books: {row.total_books}")
16    print()
17
18    # Get the number of authors each publisher publishes
19    authors_by_publisher = get_authors_by_publishers(session)
20    for row in authors_by_publisher:
21        print(f"Publisher: {row.name}, total authors: {row.total_authors}")
22    print()
23
24    # Output hierarchical author data
25    authors = get_authors(session)
26    output_author_hierarchy(authors)
27
28    # Add a new book
29    add_new_book(
30        session,
31        author_name="Stephen King",
32        book_title="The Stand",
33        publisher_name="Random House",
34    )
35    # Output the updated hierarchical author data
36    authors = get_authors(session)
37    output_author_hierarchy(authors)
This program is a modified version of examples/example_1/main.py . Let’s go over the differences:
-
Lines 4 to 7 first initialize the
sqlite_filepathvariable to the database file path. Then they create theenginevariable to communicate with SQLite and theauthor_book_publisher.dbdatabase file, which is SQLAlchemy’s access point to the database. -
Line 8 creates the
Sessionclass from the SQLAlchemy’ssessionmaker(). -
Line 9 binds the
Sessionto the engine created in line 8. -
Line 10 creates the
sessioninstance, which is used by the program to communicate with SQLAlchemy.
The rest of the function is similar, except for the replacement of data with session as the first parameter to all the functions called by main() .
get_books_by_publisher() has been refactored to use SQLAlchemy and the models you defined earlier to get the data requested:
 1def get_books_by_publishers(session, ascending=True):
 2    """Get a list of publishers and the number of books they've published"""
 3    if not isinstance(ascending, bool):
 4        raise ValueError(f"Sorting value invalid: {ascending}")
 5
 6    direction = asc if ascending else desc
 7
 8    return (
 9        session.query(
10            Publisher.name, func.count(Book.title).label("total_books")
11        )
12        .join(Publisher.books)
13        .group_by(Publisher.name)
14        .order_by(direction("total_books"))
15    )
Here’s what the new function, get_books_by_publishers() , is doing:
-
Line 6 creates the
directionvariable and sets it equal to the SQLAlchemydescorascfunction depending on the value of theascendingparametr. -
Lines 9 to 11 query the
Publishertable for data to return, which in this case arePublisher.nameand the aggregate total ofBookobjects associated with an author, aliased tototal_books. -
Line 12 joins to the
Publisher.bookskolekce. -
Line 13 aggregates the book counts by the
Publisher.nameattribute. -
Line 14 sorts the output by the book counts according to the operator defined by
direction. -
Line 15 closes the object, executes the query, and returns the results to the caller.
All the above code expresses what is wanted rather than how it’s to be retrieved. Now instead of using SQL to describe what’s wanted, you’re using Python objects and methods. What’s returned is a list of Python objects instead of a list of tuples of data.
get_authors_by_publisher() has also been modified to work exclusively with SQLAlchemy. Its functionality is very similar to the previous function, so a function description is omitted:
def get_authors_by_publishers(session, ascending=True):
    """Get a list of publishers and the number of authors they've published"""
    if not isinstance(ascending, bool):
        raise ValueError(f"Sorting value invalid: {ascending}")

    direction = asc if ascending else desc

    return (
        session.query(
            Publisher.name,
            func.count(Author.first_name).label("total_authors"),
        )
        .join(Publisher.authors)
        .group_by(Publisher.name)
        .order_by(direction("total_authors"))
    )
get_authors() has been added to get a list of authors sorted by their last names. The result of this query is a list of Author objects containing a collection of books. The Author objects already contain hierarchical data, so the results don’t have to be reformatted:
def get_authors(session):
    """Get a list of author objects sorted by last name"""
    return session.query(Author).order_by(Author.last_name).all()
Like its previous version, add_new_book() is relatively complex but straightforward to understand. It determines if a book with the same title, author, and publisher exists in the database already.
If the search query finds an exact match, then the function returns. If no book matches the exact search criteria, then it searches to see if the author has written a book using the passed in title. This code exists to prevent duplicate books from being created in the database.
If no matching book exists, and the author hasn’t written one with the same title, then a new book is created. The function then retrieves or creates an author and publisher. Once instances of the Book , Author and Publisher exist, the relationships between them are created, and the resulting information is saved to the database:
 1def add_new_book(session, author_name, book_title, publisher_name):
 2    """Adds a new book to the system"""
 3    # Get the author's first and last names
 4    first_name, _, last_name = author_name.partition(" ")
 5
 6    # Check if book exists
 7    book = (
 8        session.query(Book)
 9        .join(Author)
10        .filter(Book.title == book_title)
11        .filter(
12            and_(
13                Author.first_name == first_name, Author.last_name == last_name
14            )
15        )
16        .filter(Book.publishers.any(Publisher.name == publisher_name))
17        .one_or_none()
18    )
19    # Does the book by the author and publisher already exist?
20    if book is not None:
21        return
22
23    # Get the book by the author
24    book = (
25        session.query(Book)
26        .join(Author)
27        .filter(Book.title == book_title)
28        .filter(
29            and_(
30                Author.first_name == first_name, Author.last_name == last_name
31            )
32        )
33        .one_or_none()
34    )
35    # Create the new book if needed
36    if book is None:
37        book = Book(title=book_title)
38
39    # Get the author
40    author = (
41        session.query(Author)
42        .filter(
43            and_(
44                Author.first_name == first_name, Author.last_name == last_name
45            )
46        )
47        .one_or_none()
48    )
49    # Do we need to create the author?
50    if author is None:
51        author = Author(first_name=first_name, last_name=last_name)
52        session.add(author)
53
54    # Get the publisher
55    publisher = (
56        session.query(Publisher)
57        .filter(Publisher.name == publisher_name)
58        .one_or_none()
59    )
60    # Do we need to create the publisher?
61    if publisher is None:
62        publisher = Publisher(name=publisher_name)
63        session.add(publisher)
64
65    # Initialize the book relationships
66    book.author = author
67    book.publishers.append(publisher)
68    session.add(book)
69
70    # Commit to the database
71    session.commit()
The code above is relatively long. Let’s break the functionality down to manageable sections:
-
Lines 7 to 18 set the
bookvariable to an instance of aBookif a book with the same title, author, and publisher is found. Otherwise, they setbooktoNone. -
Lines 20 and 21 determine if the book already exists and return if it does.
-
Lines 24 to 37 set the
bookvariable to an instance of aBookif a book with the same title and author is found. Otherwise, they create a newBookinstance. -
Lines 40 to 52 set the
authorvariable to an existing author, if found, or create a newAuthorinstance based on the passed-in author name. -
Lines 55 to 63 set the
publishervariable to an existing publisher, if found, or create a newPublisherinstance based on the passed-in publisher name. -
Line 66 sets the
book.authorinstance to theauthorinstance. This creates the relationship between the author and the book, which SQLAlchemy will create in the database when the session is committed. -
Line 67 adds the
publisherinstance to thebook.publisherssbírka. This creates the many-to-many relationship between thebookandpublishertabulky. SQLAlchemy will create references in the tables as well as in thebook_publisherassociation table that connects the two. -
Line 68 adds the
Bookinstance to the session, making it part of the session’s unit of work. -
Line 71 commits all the creations and updates to the database.
There are a few things to take note of here. First, there’s is no mention of the author_publisher or book_publisher association tables in either the queries or the creations and updates. Because of the work you did in models.py setting up the relationships, SQLAlchemy can handle connecting objects together and keeping those tables in sync during creations and updates.
Second, all the creations and updates happen within the context of the session objekt. None of that activity is touching the database. Only when the session.commit() statement executes does the session then go through its unit of work and commit that work to the database.
For example, if a new Book instance is created (as in line 37 above), then the book has its attributes initialized except for the book_id primary key and author_id foreign key. Because no database activity has happened yet, the book_id is unknown, and nothing was done in the instantiation of book to give it an author_id .
When session.commit() is executed, one of the things it will do is insert book into the database, at which point the database will create the book_id primary key. The session will then initialize the book.book_id value with the primary key value created by the database engine.
session.commit() is also aware of the insertion of the Book instance in the author.books sbírka. The author object’s author_id primary key will be added to the Book instance appended to the author.books collection as the author_id foreign key.
Providing Access to Multiple Users
To this point, you’ve seen how to use pandas, SQLite, and SQLAlchemy to access the same data in different ways. For the relatively straightforward use case of the author, book, and publisher data, it could still be a toss-up whether you should use a database.
One deciding factor when choosing between using a flat file or a database is data and relationship complexity. If the data for each entity is complicated and contains many relationships between the entities, then creating and maintaining it in a flat file might become more difficult.
Another factor to consider is whether you want to share the data between multiple users. The solution to this problem might be as simple as using a sneakernet to physically move data between users. Moving data files around this way has the advantage of ease of use, but the data can quickly get out of sync when changes are made.
The problem of keeping the data consistent for all users becomes even more difficult if the users are remote and want to access the data across networks. Even when you’re limited to a single language like Python and using pandas to access the data, network file locking isn’t sufficient to ensure the data doesn’t get corrupted.
Providing the data through a server application and a user interface alleviates this problem. The server is the only application that needs file-level access to the database. By using a database, the server can take advantage of SQL to access the data using a consistent interface no matter what programming language the server uses.
The last example program demonstrates this by providing a web application and user interface to the Chinook sample SQLite database. Peter Stark generously maintains the Chinook database as part of the SQLite Tutorial site. If you’d like to learn more about SQLite and SQL in general, then the site is a great resource.
The Chinook database provides artist, music, and playlist information along the lines of a simplified Spotify. The database is part of the example code project in the project/data folder.
Using Flask With Python, SQLite, and SQLAlchemy
The examples/example_3/chinook_server.py program creates a Flask application that you can interact with using a browser. The application makes use of the following technologies:
-
Flask Blueprint is part of Flask and provides a good way to follow the separation of concerns design principle and create distinct modules to contain functionality.
-
Flask SQLAlchemy is an extension for Flask that adds support for SQLAlchemy in your web applications.
-
Flask_Bootstrap4 packages the Bootstrap front-end tool kit, integrating it with your Flask web applications.
-
Flask_WTF extends Flask with WTForms, giving your web applications a useful way to generate and validate web forms.
-
python_dotenv is a Python module that an application uses to read environment variables from a file and keep sensitive information out of program code.
Though not necessary for this example, a .env file holds the environment variables for the application. The .env file exists to contain sensitive information like passwords, which you should keep out of your code files. However, the content of the project .env file is shown below since it doesn’t contain any sensitive data:
SECRET_KEY = "you-will-never-guess"
SQLALCHEMY_TRACK_MODIFICATIONS = False
SQLAlCHEMY_ECHO = False
DEBUG = True
The example application is fairly large, and only some of it is relevant to this tutorial. For this reason, examining and learning from the code is left as an exercise for the reader. That said, you can take a look at an animated screen capture of the application below, followed by the HTML that renders the home page and the Python Flask route that provides the dynamic data.
Here’s the application in action, navigating through various menus and features:
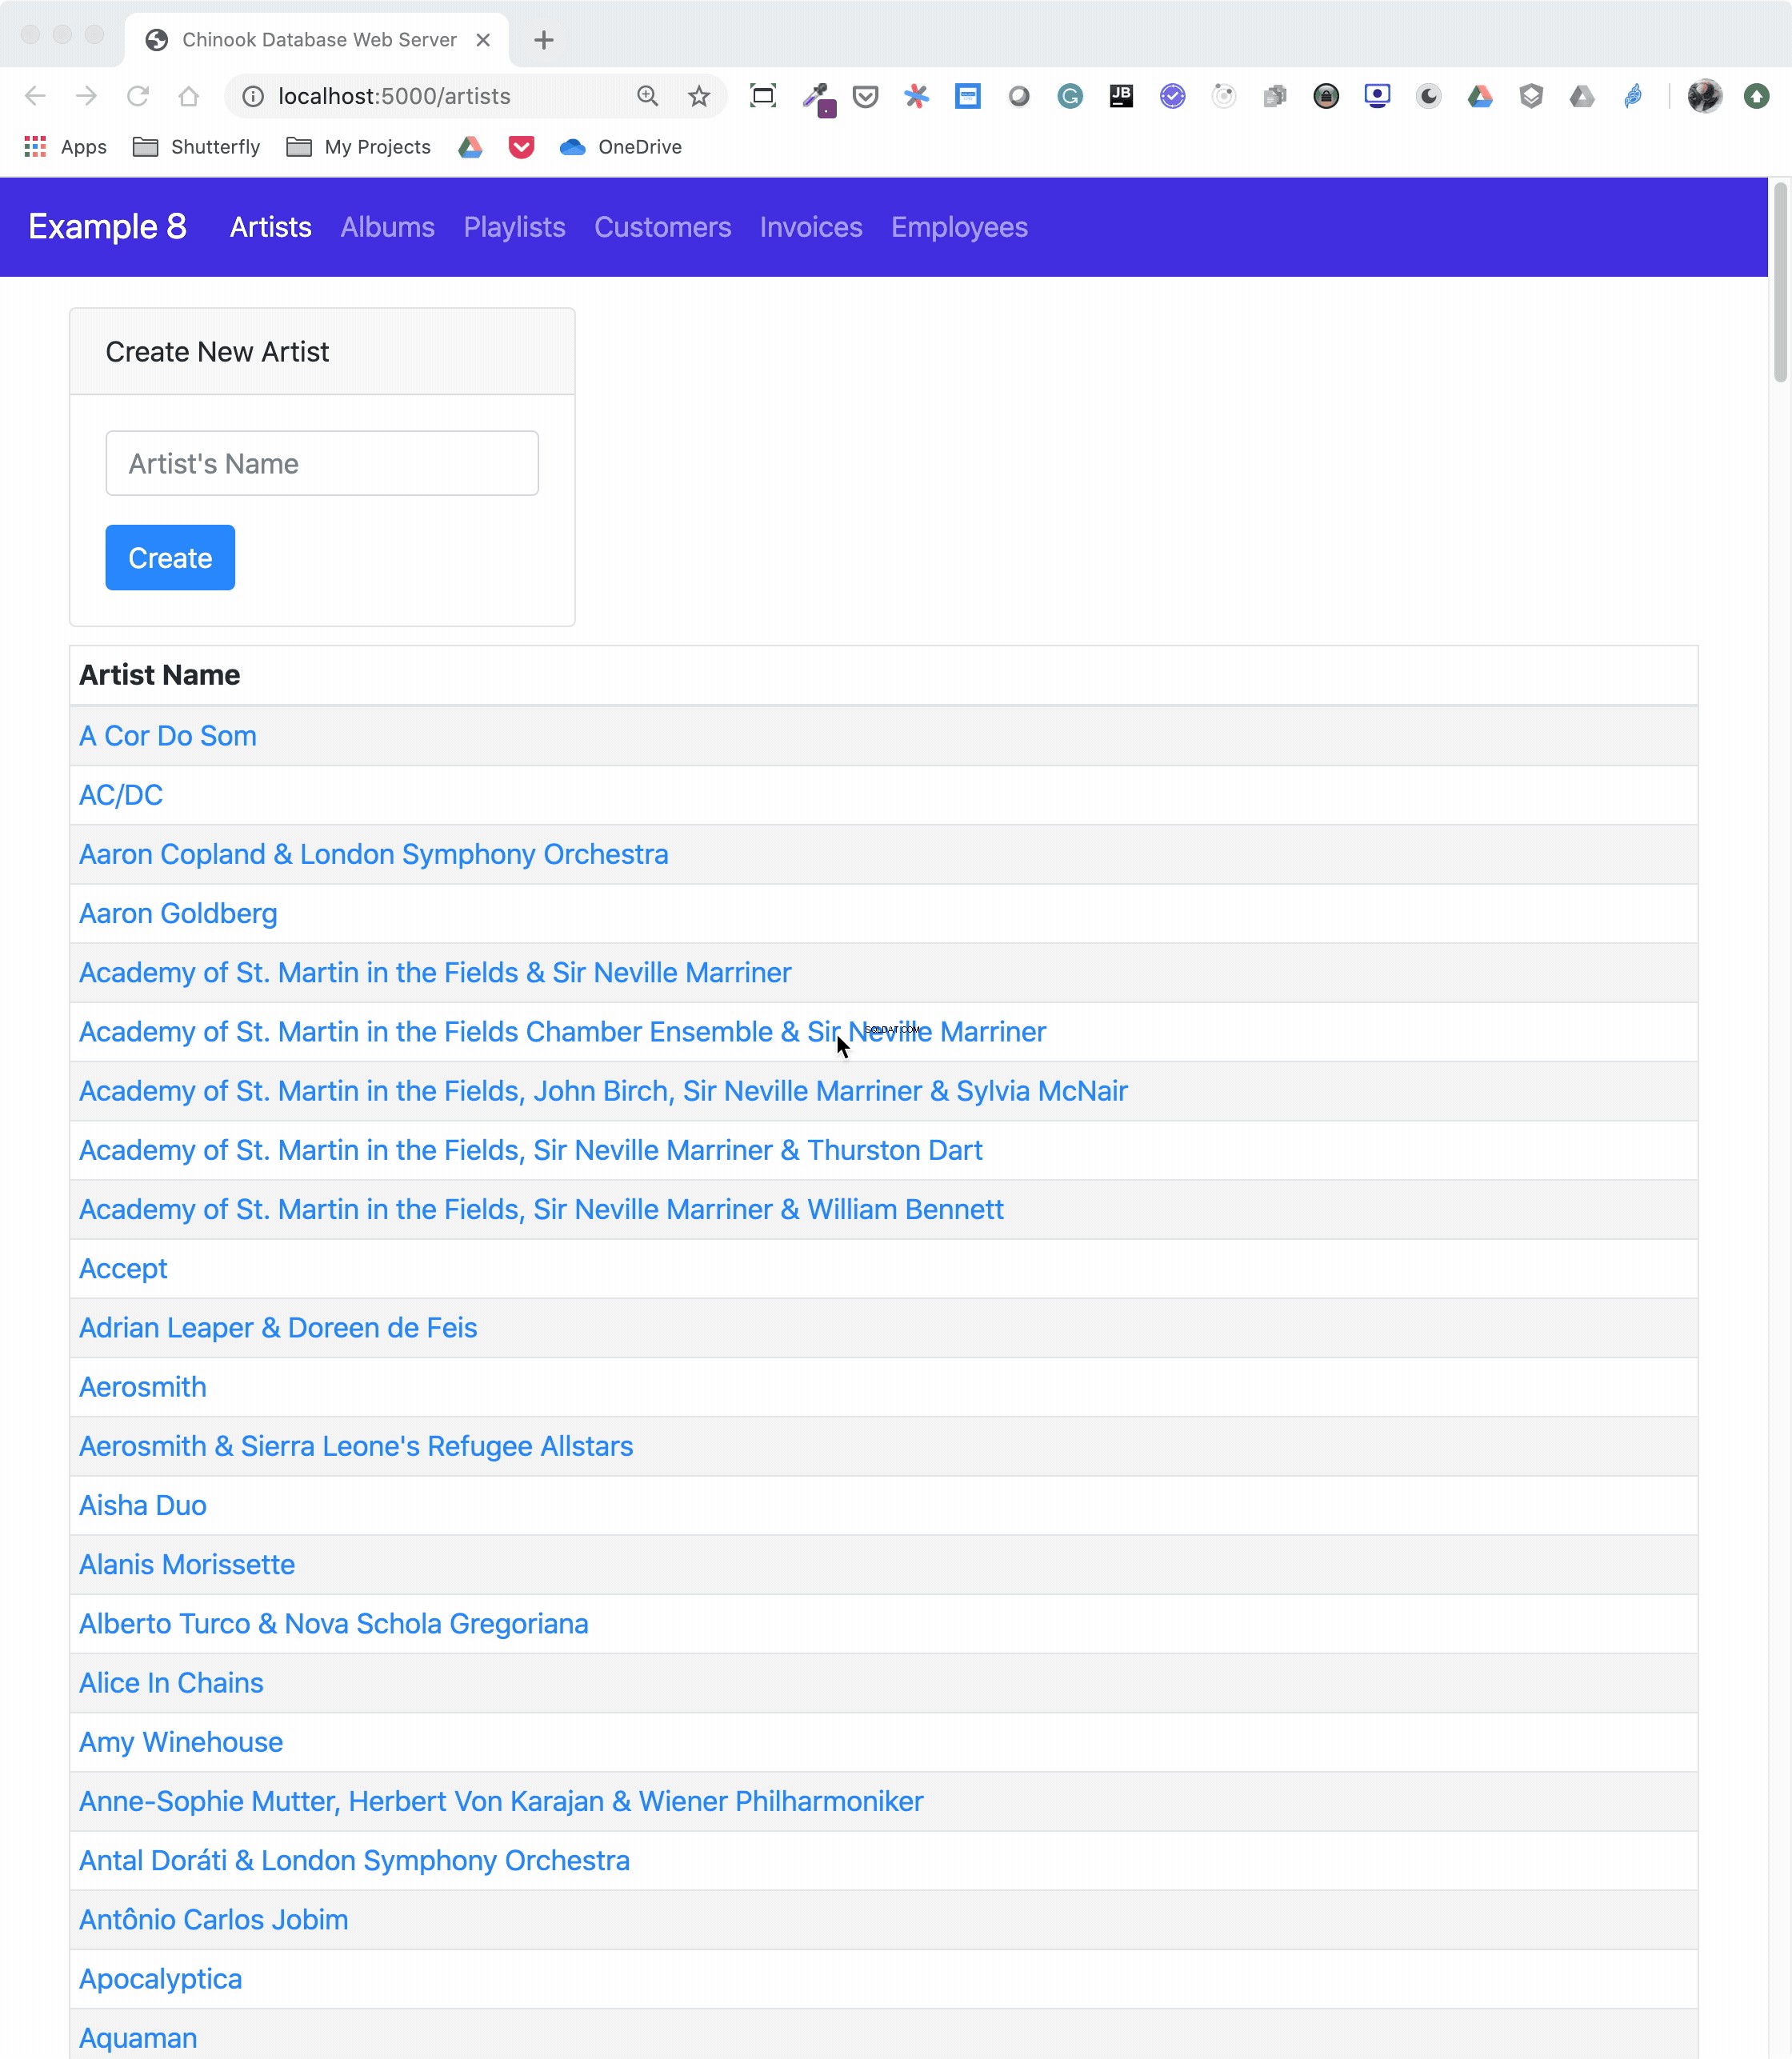
The animated screen capture starts on the application home page, styled using Bootstrap 4. The page displays the artists in the database, sorted in ascending order. The remainder of the screen capture presents the results of clicking on the displayed links or navigating around the application from the top-level menu.
Here’s the Jinja2 HTML template that generates the home page of the application:
 1{% extends "base.html" %}
 2
 3{% block content %}
 4<div class="container-fluid">
 5  <div class="m-4">
 6    <div class="card" style="width: 18rem;">
 7      <div class="card-header">Create New Artist</div>
 8      <div class="card-body">
 9        <form method="POST" action="{{url_for('artists_bp.artists')}}">
10          {{ form.csrf_token }}
11          {{ render_field(form.name, placeholder=form.name.label.text) }}
12          <button type="submit" class="btn btn-primary">Create</button>
13        </form>
14      </div>
15    </div>
16    <table class="table table-striped table-bordered table-hover table-sm">
17      <caption>List of Artists</caption>
18      <thead>
19        <tr>
20          <th>Artist Name</th>
21        </tr>
22      </thead>
23      <tbody>
24        {% for artist in artists %}
25        <tr>
26          <td>
27            <a href="{{url_for('albums_bp.albums', artist_id=artist.artist_id)}}">
28              {{ artist.name }}
29            </a>
30          </td>
31        </tr>
32        {% endfor %}
33      </tbody>
34    </table>
35  </div>
36</div>
37{% endblock %}
Here’s what’s going on in this Jinja2 template code:
-
Line 1 uses Jinja2 template inheritance to build this template from the
base.htmltemplate. Thebase.htmltemplate contains all the HTML5 boilerplate code as well as the Bootstrap navigation bar consistent across all pages of the site. -
Lines 3 to 37 contain the block content of the page, which is incorporated into the Jinja2 macro of the same name in the
base.htmlbase template. -
Lines 9 to 13 render the form to create a new artist. This uses the features of Flask-WTF to generate the form.
-
Lines 24 to 32 create a
forloop that renders the table of artist names. -
Lines 27 to 29 render the artist name as a link to the artist’s album page showing the songs associated with a particular artist.
Here’s the Python route that renders the page:
 1from flask import Blueprint, render_template, redirect, url_for
 2from flask_wtf import FlaskForm
 3from wtforms import StringField
 4from wtforms.validators import InputRequired, ValidationError
 5from app import db
 6from app.models import Artist
 7
 8# Set up the blueprint
 9artists_bp = Blueprint(
10    "artists_bp", __name__, template_folder="templates", static_folder="static"
11)
12
13def does_artist_exist(form, field):
14    artist = (
15        db.session.query(Artist)
16        .filter(Artist.name == field.data)
17        .one_or_none()
18    )
19    if artist is not None:
20        raise ValidationError("Artist already exists", field.data)
21
22class CreateArtistForm(FlaskForm):
23    name = StringField(
24        label="Artist's Name", validators=[InputRequired(), does_artist_exist]
25    )
26
27@artists_bp.route("/")
28@artists_bp.route("/artists", methods=["GET", "POST"])
29def artists():
30    form = CreateArtistForm()
31
32    # Is the form valid?
33    if form.validate_on_submit():
34        # Create new artist
35        artist = Artist(name=form.name.data)
36        db.session.add(artist)
37        db.session.commit()
38        return redirect(url_for("artists_bp.artists"))
39
40    artists = db.session.query(Artist).order_by(Artist.name).all()
41    return render_template("artists.html", artists=artists, form=form,)
Let’s go over what the above code is doing:
-
Lines 1 to 6 import all the modules necessary to render the page and initialize forms with data from the database.
-
Lines 9 to 11 create the blueprint for the artists page.
-
Lines 13 to 20 create a custom validator function for the Flask-WTF forms to make sure a request to create a new artist doesn’t conflict with an already existing artist.
-
Lines 22 to 25 create the form class to handle the artist form rendered in the browser and provide validation of the form field inputs.
-
Lines 27 to 28 connect two routes to the
artists()function they decorate. -
Line 30 creates an instance of the
CreateArtistForm()class. -
Line 33 determines if the page was requested through the HTTP methods GET or POST (submit). If it was a POST, then it also validates the fields of the form and informs the user if the fields are invalid.
-
Lines 35 to 37 create a new artist object, add it to the SQLAlchemy session, and commit the artist object to the database, persisting it.
-
Line 38 redirects back to the artists page, which will be rerendered with the newly created artist.
-
Line 40 runs an SQLAlchemy query to get all the artists in the database and sort them by
Artist.name. -
Line 41 renders the artists page if the HTTP request method was a GET.
You can see that a great deal of functionality is created by a reasonably small amount of code.
Creating a REST API Server
You can also create a web server providing a REST API. This kind of server offers URL endpoints responding with data, often in JSON format. A server providing REST API endpoints can be used by JavaScript single-page web applications through the use of AJAX HTTP requests.
Flask is an excellent tool for creating REST applications. For a multi-part series of tutorials about using Flask, Connexion, and SQLAlchemy to create REST applications, check out Python REST APIs With Flask, Connexion, and SQLAlchemy.
If you’re a fan of Django and are interested in creating REST APIs, then check out Django Rest Framework – An Introduction and Create a Super Basic REST API with Django Tastypie.
Poznámka: It’s reasonable to ask if SQLite is the right choice as the database backend to a web application. The SQLite website states that SQLite is a good choice for sites that serve around 100,000 hits per day. If your site gets more daily hits, the first thing to say is congratulations!
Beyond that, if you’ve implemented your website with SQLAlchemy, then it’s possible to move the data from SQLite to another database such as MySQL or PostgreSQL. For a comparison of SQLite, MySQL, and PostgreSQL that will help you make decisions about which one will serve your application best, check out Introduction to Python SQL Libraries.
It’s well worth considering SQLite for your Python application, no matter what it is. Using a database gives your application versatility, and it might create surprising opportunities to add additional features.
Conclusion
You’ve covered a lot of ground in this tutorial about databases, SQLite, SQL, and SQLAlchemy! You’ve used these tools to move data contained in flat files to an SQLite database, access the data with SQL and SQLAlchemy, and provide that data through a web server.
In this tutorial, you’ve learned:
- Why an SQLite database can be a compelling alternative to flat-file data storage
- How to normalize data to reduce data redundancy and increase data integrity
- How to use SQLAlchemy to work with databases in an object-oriented manner
- How to build a web application to serve a database to multiple users
Working with databases is a powerful abstraction for working with data that adds significant functionality to your Python programs and allows you to ask interesting questions of your data.
You can get all of the code and data you saw in this tutorial at the link below:
Download the sample code: Click here to get the code you’ll use to learn about data management with SQLite and SQLAlchemy in this tutorial.
Further Reading
This tutorial is an introduction to using databases, SQL, and SQLAlchemy, but there’s much more to learn about these subjects. These are powerful, sophisticated tools that no single tutorial can cover adequately. Here are some resources for additional information to expand your skills:
-
If your application will expose the database to users, then avoiding SQL injection attacks is an important skill. For more information, check out Preventing SQL Injection Attacks With Python.
-
Providing web access to a database is common in web-based single-page applications. To learn how, check out Python REST APIs With Flask, Connexion, and SQLAlchemy – Part 2.
-
Preparing for data engineering job interviews gives you a leg up in your career. To get started, check out Data Engineer Interview Questions With Python.
-
Migrating data and being able to roll back using Flask with Postgres and SQLAlchemy is an integral part of the Software Development Life Cycle (SDLC). You can learn more about it by checking out Flask by Example – Setting up Postgres, SQLAlchemy, and Alembic.